
Step by Step Tutorial Guide on How to Create and Network a Website by Niche
Getting online is easier than before so it shouldn’t be more complicated for you with over 200 million website on the web, anyone today can create a website based on his or her needs.
There are two ways to make a website of your choice: either with a website builder or with WordPress. website builders like Wix, Squarespace and Weebly are the best way for tech novices to get online.
This article will give you a better choice by providing website tools best based on your niche or your purpose, regardless of your technical skill level.
Disclosure: The impartial research carried out are based on my personal experience and users feedback, all tips provided are to help you get started faster at no cost to you, I may get commissioned from your purchase.

source: yeeply.com
You are about to be guided on the simplest website building processes for getting a ready to use website regardless of your tech skills, if you would buckle up and follow the convenient steps you are just an hour to launching your website especially with a website builder.
Looks fulfilling? Time to get some work done…
Option 1 : Create a Website with Website Builder’s (by categories)
How to Build a Website in 9 easy Steps
- Choose the right website builder for your niche or needs.
- Sign up for a plan that best suit your needs and budget.
- Choose a unique and branded domain name.
- Pick a design template that suit you niche or needs.
- Customize your template design .
- Upload and format your own content.
- Choose and download apps.
- Preview and test your website.
- Publish your website on the internet.
Step 1: Choose the right website builder for your niche or needs.
A good number of people who want to be on the web fast use website builders to make a business or ecommerce website.
Wix alone has over 100 million subscribers, while Shopify recently passed 1.2 million.
This is mainly because Website builders gives you the power to make a website, regardless of technical skill. Gone are those days when making a website on the internet required a standard understanding programming languages like HTML (Hypertext Markup Language, CSS (Cascading Style Sheets) with other programming languages.
As new programming languages are emerging all of this can be confusing since there are not sure way to build a website, A Website builders can be a good choice since it’s takes care of major technical changes which you might not have time or the knowledge for and let you focus on things that matters like your design and content.
Most website can be successful built through templates, others through drag-and-drop interfaces without coding knowledge.
So I bet you have been asking which website builder should you choose?
What is the best way to build a website and get online? I understand this are your everyday questions you try to find the answer With so many website builders available it is definitely going to be time taking and exhausting to find a website builder
In other to help you make smart decision I have done the homework through a very deep and in-depth research and in fact it is organized according to the best function they can deliver so be rest assured I am working round the clock to see that I deliver the best through personal experience and user ratings.
With impartial research in depth, all of the ratings and reviews are based on user testing and interviews, while hundreds of features are track across dozens of products in order to provide you a raw but yet effective method for making the right decision hence giving a view of how what, and where you can get the best you ave being looking for.
In other words I want to help you find a website builders that do not only fit your needs but also suitable to your budget. Without much further ado I have listed a list of the best website builder available on the market and what they best fit in.
Let’s go
- Free and Paid Beginner Friendly Website Builders for Business and their review:
Table of Contents
Wix

Wix is perfect for small businesses, restaurants, online stores and artists such as musicians and photographers due to lot of flexibility customizing your design and the cutting edge templates with ready made designs for your needs.
Wix is a free, user-friendly, website building platform. It can help you to create amazing, professional-looking sites, which can be updated and edited with ease with no technical skills required.
Your website would be optimized for mobile devices and search engine friendly, with numerous apps available from the Wix App Market you can integrate useful and relevant functionality to your website.
| Wix | Free Plan Yes | SSL Yes | Automatic Backup Yes | Apps Yes |
Weebly

Weebly is great if you have a good coding experience this is because its gives you access to the templates source code which can help you tweak some perfect designs for your business although their themes are not only stylish but also responsive, you don’t need to worry about mobile display display since weebly design adapt perfectly to mobile devices and it’s SEO friendly.
They also have a professional page template system customization, allowing you to easily create a very good website.
Through the App Center you can add a wide range of extra functionality made by Weebly and third parties. E-commerce is included in all plans available.
| Weebly | Free Plan Yes | SSL Yes | Automatic Backup No | Apps Limited |
Site123

Site 123 is built for individuals and businesses need to get things done online without much editing. If you need a website up fast but don’t have any knowledge of coding, or how to create a website in general, then Site123 is a great choice.
Site123 uses design assistance to help you create a website– you will just be asked a general type of questions about what type of website you’re after and then generates you a template with the relevant features, many site owner with little technical knowledge has claimed it is a very time saving option to get things up fast.
SITE123 makes website building very easy, even for beginners. A user-friendly interface, helpful tips and tutorials, and 24/7 live chat are there to guide you through the entire process. The mobile-responsive templates and e-commerce features will be more than sufficient for some users.
However, if you’re planning on building a complex site, or if you’re looking for more design freedom, SITE123 may be too limiting for you.
| Site123 | Free Plan Yes | SSL Yes | Automatic Backup No | Apps Yes |
Go daddy

Go daddy Has been most used and known for their domain name and web hosting services, But they also offer website builders to build your website.
The beginner friendly website builder provides responsive mobile optimized design, the easy to use editor is well structured for easy customization involving adding and removing elements or blocks to your website.
Do you need to accept order’s or you want your website to work like an online store? The latest version provides a solution for marketing where you get access to e-commerce features like selling digital products, abandoned cart recovery emails, email newletter tool and the ability to integrate with marketplaces such as Amazon and eBay.
| Go Daddy | Free Plan Yes | SSL Yes | Automatic Backup Yes | Apps Yes |
- Free and Paid Beginner Friendly Website Builders for Creatives and Portfolio and their review:
Squarespace:

Squarespace is popularly known as a dream website builder for creative professional with little coding or technical experience but needs sleek designs. With over 60 templates that are responsive to mobile devices, sqaurespace also offers high quality images and ready to use design templates that allows you as a creative showcase your work.
Squarespace is a drag-and-drop website builder that provides a clean and modern interface for photographers, artist and even marketers to work with, with the G Suite and PayPal integrations plus SEO tools, e-commerce functions, and easy social media integration it is a great tools to support you as a business owners and creatives if you are also looking to sell product online.
| Sqaurespace | Free Plan No | SSL Yes | Automatic Backup No | Apps Yes |
Zenfolio:

Zenfolio is a niche-oriented website builder allows you to both display and even sell your work, while also providing the functionality to create hiring pages, galleries, and everything in between. there are very few templates for for you to pick from, but the templates that provided are mobile-friendly.
Based on your choice of budget from the available plans you’ll receive a huge variety of different features to utilize on your website – everything from content uploads, social media integrations and search engine optimization, plus eCommerce features you’ll be able to receive sales reports and payouts, display featured galleries and products, accept all of the major payment options, and so on.
| Zen folio | Free Plan No | SSL No | Automatic Backup No | Apps Limited |
IM creator

IM creator is loved by creators because it offer’s great portfolio features that allows you launch your portfolio website quickly, you can add and remove elements easily from your desired templates, modify existing elements, and integrate niche-specific features.
There are professional designed templates for you to choose from either for photography, music, graphic designing or tech startups that are fully responsive and mobile optimized and are also cleverly categorized by niche.
IM creator offer a very exclusive free plan for students, artist and non profits with access to advanced features and tools, of which you are required to provide written proof.
Although there is no drag-and-drop feature, it does provide some beautiful templates, unlimited bandwidth and disk space, basic eCommerce, and you can connect your own domain.
| IM creator | Free Plan Yes | SSL No | Automatic Backup No | Apps No |
Format

Format is a specialized portfolio websites builder, Format is believed to have everything you need to showcase your work and unveil multiple opportunities with it. The website builder allows creating trendy portfolios with responsive design and versatile structure. It makes it possible to integrate a web store into your portfolio website to sell the works and services you offer
What you can also do with format is sharing private client proofing galleries, reviewing customer feedbacks, enabling file downloads, watermarking your own images It is also possible to adjust client access rights to password protect separate galleries and grant individual access to certain users only Format allows integrating social media accounts into your project.
| Format | Free Plan No | SSL Yes | Automatic Backup Yes | Apps Limited |
- Free and Paid Beginner Friendly Website Builders for Blogs and Information Blog and their review:
Wordpress.com

WordPress.com is a platform for self-publishing that is popular for blogging and information source. It is owned and operated by Automattic Inc.
The text editor I believed are much more friendly to beginners as it uses blocks to add text, media or any other kind of content. It comes installed by default, a WordPress user has the ability to customize his or her websitewith plugins and there are over 56,77 free and premium plugins available for customization.
Visitors can sign up to your newsletter through the Mail-chimp integrated service, if mailchimp is not your type you can check on ther services but you will need a plugin for that.
With wordpress.com you can get access to other email marketing integration’s, popups and discount offers, or specific analytics tools which means you can have complete control over marketing.
All of this requires you to install plugins which you can only do with a business plan or higher.
| Wordpress.om | Free Plan Yes | SSL Yes | Automatic Backup Yes | Apps Limited |
Constant Contact

Constant Contact is best known for its email marketing service, but they also claim to have the “industry’s best website building and ecommerce platform, it use AI to auto-generate a website for you it walks you through the website building process step-by-step in a simple and straightforward manner. You simply tell the platform what your website is about, pick a title, add a main image and/or logo, pick a color scheme, choose your font, and you are set for launch.
Constant Contact doesn’t have its own app store packed with third-party plugins but the ADI makes it easy to get a working site together, and you don’t feel overwhelmed with options
It has a Generous free plan, easy-to-understand analytics, excellent and email functionality to mention a few.
| Constant Contact | Free Plan Yes | SSL Yes | Automatic Backup Yes | Plugins No |
Ghost

Ghost was launched as an alternative of WordPress to focus only on blogging. It has SEO and speed built-in. It’s easy to use and maintain.
The administration features are good, there’s plenty of themes and It’s easy to use overall.
Also, since it’s running on nodejs, performance is better than most CMS platforms. If it weren’t for the lack of creation and update actions in the API, this would be the best CMS. (Yes, they exist, but they are private, not documentated and can change any second.) Ghost CMS have inbuilt integrations to hundreds of services and the best part is that you can also add custom integrations to completely migrate from WordPress to Ghost CMS.
| Ghost | Free Plan No | SSL Yes | Automatic Backup No | Plugins Limited |
- Free and Paid Beginner Friendly Website Builders for E-commerce and online store and their review:
Shopify
Shopify is a popular ecommerce platform available on the market that helps you build your own online store, with hundreds of built-in features and tons of apps without coding.
It requires no software installations and no hosting services are required, with over 1,200 apps, specialized features such as inventory tracking and shipping tools, and a range of price plans,
Shopify is a powerful platform to choose Shopify has a free trial and number of plans, so you can choose one that best suits your needs and budget.
| Shopify | Free Plan Yes | SSL Yes | Automatic Backup Yes | Apps Unlimited |
Bigcommerce

BigCommerce is a paid-for, ‘hosted’ e-commerce solution that allows business owners to set up an online store and sell their products online.
BigCommerce has the best in-house features of any ecommerce builder. These provide a high level of quality and reduce the mishap you may have on third party apps.
You effectively have everything you need right at your fingertips, and for no extra cost, over 65 integrated payment gateways to choose from. With one-click setup, mobile payments, and multiple currencies supported, BigCommerce does its best to get you paid fast without hassle.
| Go Daddy | Free Plan Yes | SSL Yes | Automatic Backup Yes | Apps Limited |
Woo commerce

WooCommerce is an open source ecommerce plugin that’s built for WordPress, it is a free, popular, easy to learn platform that can help you to build almost any type of powerful ecommerce website. You can install the various mobile-optimized templates or even develop your own template.
If WooCommerce is in itself free of charge, don’t forget the hidden costs of hosting, a domain, the theme, additional plugins, or extensions.
Since it is exclusively for wordpress it is best to start with Bluehost their offers focus on several pre-installed “WordPress + WooCommerce” bundles and siteground They have WordPress (WooCommerce) optimized servers.
| Woo commerce | Free Plan Yes | SSL Yes | Automatic Backup Yes | Plugins Unlimited |
We have come to the very end of the list, Although this listed easy to use website builder are just a great pick from the other website builders.
But they perform best overall in the research conducted, while it depends on your need for a great selection.
To make your decision making easier WordPress.com is best built and widely used for blogging, while Shopify still stood its ground as still the most used and efficient ecommere store and squarespace for portfolio showcasing.
Step 2: Sign Up For a Plan That Suits Your Needs and Budget:
Once you’ve chosen your website builder, it’s time to find your price plan. If what you just need is a simple rich feature free website, let’s take for instance a a portfolio or small service business, the cheaper plans will probably work just fine. If you need something more functional with rich feature, it is recommended you check out the features on offer with the more expensive plans. If in doubt, start by registering to the free trial if available and then upgrade later upon satisfaction.
Once you’ve settled on a website builder, you need to sign up for a plan. Website builders tend to offer multiple plans. While different sites may have different needs based on what is supposed to be built for, plans ensure you aren’t paying for things you don’t need by giving you breakdown of what you are purchasing.
With flexibility in ensuring transparency of plans, Website builder plans can be different in price, but may as we all know its can cost between $8 and $40 per month, which is an all inclusive price. If you’re on a budget, there is always a free plan with most website builder that you can start with but be aware that they also have their disadvantages.
This is a huge plus of internet site developers in comparison to website builders. An internet developer is estimated to charge between $300 and $1,000 for just template customization, and a totally custom designed website constructed from non-existence will regularly result to a lot of money being spent. Making your personal internet site using a builder, meanwhile, permits you to get a completely functioning website up and working for less without breaking the bank.
Can you make a website for free?
It is possible to create a free website, in fact many website builders and other blogging platform makes it easier to host your contents online fro free But you should remember that a free accounts either on website builders or other free CMS can suspend your access to very important featured which you can only access by upgrading.
You really can’t use your desired domain name, and your free website will have ads telling your visitors where you are possibly hosted and your free website may also be used as a marketing channel. You should only go for a plan if you’re looking to learn more about website building or to test one or two things before your go live.
It is important you go for a paid plan if you want a professional, feature-rich website and appear has some one to be trusted, of which you’re going to have to pay a renewal fee without breaking the bank.
Check out the best hand picked website builders and click on the choose your plan to see what you can get just by signing up without spending more than you budget.
| WIX | WEEBLY | SITE123 | GODADDY | |
| Cost | FREE PREMUIM | FREE PREMUIM | FREE PREMUIM | FREE PREMUIM |
| Ease of use | Yes | Yes | Yes | Yes |
| SEO Plugin | Available | Available | Available | Available |
| Plugins | Limited plugins | Limited plugins | Limited Plugins | Limited Plugins |
| Theme | 500+ themes | 100+ themes | 1o0+ themes | Limited themes |
| Mobile Friendly | Yes | Yes | Yes | Yes |
| Choose Your Plan | Choose Your Plan | Choose Your Plan | Choose Your Plan |
| Square space | Zenfolio | IM creator | Format | |
| Cost | Start $8/ month | FREE PREMUIM | FREE PREMUIM | FREE PREMUIM |
| Ease of use | Yes | Yes | Yes | Yes |
| Social media integration | Yes | Yes | Yes | Yes |
| Plugins | Limited plugins | Limited plugins | Limited Plugins | Limited Plugins |
| Theme | 30+ themes | 10+ themes | 30+ themes | 20+ themes |
| Mobile Friendly | Yes | Yes | Yes | Yes |
| Choose Your Plan | Choose Your Plan | Choose Your Plan | Choose Your Plan |
| Wordpress.com | Constant Contact | Ghost | |
| Cost | FREE PREMUIM | FREE PREMUIM | FREE PREMUIM |
| Ease of use | Yes | Yes | Yes |
| SEO support | Yes | Yes | Yes |
| Blogging | Flexible | Limited | Limited |
| Theme | Unlimited | 100+ themes | Limited themes |
| Mobile Friendly | Yes | Yes | Yes |
| Choose Your Plan | Choose Your Plan | Choose Your Plan |
| Woo Commerce | Big Commerce | Shopify | |
| Cost | FREE PREMUIM | FREE PREMUIM | FREE PREMUIM |
| Ease of use | Yes | Yes | Yes |
| Templates | Unlimited | UnLimited | Unlimited |
| Payment Processor | Available | Available | Available |
| E-commerce Plugins | Unlimited | Unlimited | Unlimited |
| Sales features | Yes | Yes | Yes |
| Choose Your Plan | Choose Your Plan | Choose Your Plan |
Rating on this graph is done with the help of impartial personal test and user ratings
Step 3: Choose a Unique and Relevant Domain Name:

Domain name is the address of your website that people type in the browser URL bar to visit your website. Your own custom domain name adds professional credibility to your business, Provides visibility for your brand, much like receptionist to your business, and a good domain should create awareness and attract customers.
Quick checklist for purchasing a good domain name:
- Do not generate your domain name from slangs
Consider if today you are trying to satisfy or belong to some set of beliefs either from an high school experience or political ruins for your domain name. You would possibly sound very unprofessional, however the audience might probably locate that choice of phrases laughably outdated.
Making plans for long-time period achievement means picking a domain name with classic attractiveness, not a domain name that can fade from popularity within a few years.
- Make your research to avoid hidden fees
As with any purchase decision, price can be a big factor you would like to consider. It is important to know that it’s easy to be lured into buying a domain at a very low price or a price that sounds too good to be true.
But don’t be fooled, some domain registrars offer promotional pricing at an extremely low cost or rather at no cost at all, but then hide lots of fees in the contract, lock you in after your purchase, and charge high renewal rates of which if you don’t pay you lose the domain name to your competitor.
- A shorter domain name is better
As we just discussed, a good domain name is easy to remember – and shortening it helps a lot. If there are multiple words in the domain, people will need to remember all of them and the order they’re in, not to mention correctly typing the domain name. There aren’t many one-word domain names available today, but they are good domain name provider for finding a short domain.
Don’t hesitate to register your perfect domain name with this best domain name provider:
| Domain.com | Godaddy | Namecheap | |
| Domain Cost | $9.99 per year for a .com | $9.99 per year for a .com | $8.88 per year for a .com |
| Customer Support | 24/7 phone and FAQ area | 24/7 phone, live chat and FAQ area | live chat, email support and FAQ area |
| SSL Security | $8.99 per year per domain | $9.99 per year per domain | free |
| Choose Your Plan | Choose Your Plan | Choose Your Plan |
Once you’re sure about a domain name, simply register it as part of the signup process with your chosen website builder.
Step 4: Pick a Design Template You Love

It is great to still have you here, now that you’ve chosen a website builder, signed up for a plan that best suit your budget and needs, and registered a domain.
You’re ready to start creating a website with just a few actions. Rather than leaving you to figure all of the necessary actions to be taken by yourself your chosen website builder should support you through the process with templates.
Templates provide a framework for your website – a canvas for you to tweak the content of your website onto. They’re how you can have a website that that best fits your purpose without having to hire a designer.
Somewhere among the thousands of website builder templates hanging around the internet is the perfect layout for your site.
I’ve examined and gotten feedback from templates directory ,through as many templates as possible to create this list of the most used and responsive templates, so you have a ready to use or more selective place to start searching.
According to the research here are most favourite templates used:
- Best Templates for Creatives:
Utica by Squarespace
Christian Adams by Site123
Kevin Matsuya by Squarespace
- Best Templates for Businesses and Local communities:
Clean Lines by Weebly
Acquire – Slick by Weebly
Barbosa by Squarespace
- Best Templates for Portfolio:
Press Kit by Wix
DJ Beat by Site123
Kitui by Squarespace
- Best Templates for Blogs
The Traveler by Site123
Personal Blog by Wix
Bedford by Squarespace
- Best Templates for Events
Tech Meetup by Site123
Business Conference by Wix
Carmine by squarespace
Although your website builder will guide you to this stage after you’ve signed up. Most templates are categorized by industry, niche or the purpose. It is advisable you preview and read reviews if available before going on final templates.
Squarespace website builder came out on top in the research for best design, followed by wix with also very good designs so if you still haven’t found your perfect match, it’s a good place to start!
Step 5: Customize Your Template Design

As we said in the last step, templates provide a layouts. It is possible you find website that uses the same designs as yours because of the large number on the use of website builder, so it is very essential you find a template that makes you stand out or at the other way customize your templates.
What goes into customizing a website? Well, that’s largely up to you. Website builders are very flexible these days.
Essential Customization can include:
- Changing the size, colors, and fonts of buttons
- Editing the images on your homepage gallery
- Choosing a different color palette
- Adding new pages to your navigation
- Adding new elements like contact forms and menus
- Linking/embedding social media channels
Most website builders will show you the process on how to go about editing and customizing your templates, so don’t get overwhelmed or feel they is more to do. They understand people make use of web builders these days in order to build a website in a simple method and build a website as soon as possible.
Since your major occurrence might be the drag and drop interface As is so often the case with website builders, don’t be afraid to play. You’ll be surprised by how how much you can do.
If those template customizations don’t look like enough for you (though if you’re building your first website, they will be), you might want to think about building your website on an open source platform like WordPress.org – this is the ‘Option 2’ ( a full guide on how to use wordpress can be found in this article)
You will get more flexibility, but if you’re not a coder or you have little technical knowledge, learning WordPress takes a lot of time — especially compared to drag-and-drop website builders.
You can have access to tweak the templates as part of a free trial with most website builders, knowing how to customize your website before you upgrade will save you the cost of dissatisfied with the available templates
Step 6: Upload and Format Your Own Content
Now your website is starting to take shape, it’s time to fill it with your own images and written content. You can replace any ‘placeholder’ content already on your template, as well as ‘dragging’ text and image boxes around each page (if you use a drag-and-drop builder).
Once you’ve completely setup the colors and layout of your website, it’s time to start adding your content – that means images, videos and text.
Quick checklist for a homepage
- A slider or hero image with a headline and subheadline.
- A small section to tell readers more about what your website is about.
- The main call-to-action button taking readers to an important page, post, or email opt-in form.
- Internal links pointing to your important content to make it easy for readers to navigate around your site.
Quick checklist for a better About Page
- Who you are.
- What motivated you to start your business
- Your expertise or background to build trust with your readers.
- The pain point you’re solving and how what you have learnt dealing with the struggles
- Your achievements so far.
- A call-to-action.
A good Contact Page should contain:
- An email address
- A phone number
- Active social media links,
- A contact form.
Step 7: Make your content stand out with images and infographics
Now, on to graphics. When it comes to picking the right display for your website, consistent quality is key, It is advisable to avoid blurry or low resolution images that does not speak to your audience on what you contents is all about.
You can get access to free and licensed free images from some web builders that you can use at will. If not, there are plenty of free image sites available online.
Unsplash

Unsplash is a website dedicated to sharing stock photography under the Unsplash license.
This website claims over 207,000 contributing photographers and generates more than 17 billion photo impressions per month on their growing library of over 2 million photos.
Pixabay

Pixabay is an international, copyleft and free-to-use website for sharing photos, illustrations, vector graphics, film footage and music, As of November 2017, Pixabay is said to offer over 1,188,454 free photos, illustrations, and vectors and videos.

Pinterest is an american leading image sharing and social media service designed to enable you save and discover information’s and ideas on the network using images and, on a smaller scale, animated GIFs and videos, in the form of pinboards.
Getty Images

It is a supplier of stock images, editorial photography, video and music for business and consumers, with an archive of over 200 million assets.
You can find the perfect royalty-free image for your next project from the world’s best photo library of creative stock photos, vector art illustrations, and stock photography.
Step 8: Choose and Download Apps

Check out your website builder app store to add any missing functionality and extend your capacity with apps such as forms, widgets and social media integrations to your website. There’s an app for just about anything, and downloading them is really simple.
Quick checklists on The essential tools to try for business growth:
Google Analytics

Google Analytics is a web analytics service offered by Google that tracks and reports website traffic, this analytics provides information about the number of visitors to a website and the number of page views.
It helps gauge traffic and popularity trends, which is useful for market research.
Wix Logo Maker

Wix Logo Maker provides the tools necessary to create a business logo, and you don’t have to put in any difficult design work. Wix Logo Maker is a cost-saving way to make use of professional design tools and insights.
The option to customize your logo ensures that you’ll be satisfied with the end result, and you get full commercial use rights of any logo you create. you’ll just answer a few questions about your type of business and your personal design preferences.
Canva

Canva is a graphic design platform that allows users to create social media graphics, presentations, posters, documents and other visual content. Users can choose from many professional designed templates, and edit the designs and upload their own photos through a drag and drop interface.
Canva also allows you to collaborate with your team or design partners on a visual, within the same platform. Simply click on “Share”, navigate to “Link
Aweber

Aweber is an email marketing provider that allows you to, create a mailing list and capture data onto it, design newsletters that can be sent to the subscribers on your list.
You can automate your emails marketing via use of ‘autoresponders’
Aweber, comes with significantly more advanced automation features, and it is cheaper too than its competitors.
HootSuite

Hootsuite is a social media management tool with features to help with planning, scheduling, and syndicating social posts, covers almost every aspect of a social media manager’s role.
It basically functions as a dashboard where you can control all of your company’s social media accounts in one place. It is great for driving engagement because you can respond instantly on any channel, to what people are saying about your brand online.
Google Drive

Google Drive is a cloud-based storage solution that allows you to save files online and access them anywhere from any smartphone, tablet, or computer. You can use google drive on your computer or mobile device to securely upload files and edit them online. Drive also makes it easy for others to edit and collaborate on files.
Google Drive allows you to store important business files securely that can be recovered on their servers, synchronize files across devices, and share files so you don’t have to lose them
Stripe

Stripe primarily offers payment processing software and application programming interfaces for e-commerce websites and mobile applications.
Stripe is a simple way to accept payments online. Stripe has no setup fees, no monthly fees, and no hidden charges.
Instapage

Instapage is a service that lets you build landing pages for your online marketing and promotion campaigns with ease.
It offers features such as A/B Testing, multiple campaign management, easy page building, and lot more. It is the leader in post-click automation and helps digital advertisers designed to scale marketing efforts while lowering the costs.
Step 8: Preview and Test Your Website

Always preview any changes to your website before publishing them. You need to be sure things are working the way you want them to.
Quick checklist before making your website live that you should consider:
- Is all the spelling and grammar correct?
- Are all the buttons on the menu working?
- Does your site fulfill a purpose?
- Is your formatting consistent?
- Does it function on desktop and mobile phone screens?
- Does the site load quickly?
How do you preview your website?
Website builders make previewing your site really easy. Usually you just have to hit the preview button in the editor mode to see what your website would look like live. Most offer a toggle so you can see how it works on different screen sizes.
Don’t forget about making your website display fit on mobile devices With the daily use of mobile device, it is said that more than half of searches by users are carried out on mobile, and this number is only on the up. Making your mobile experience a seamless one is a must for any successful site.
An easy-to-use preview mode saves you a lot of time as you won’t need to keep saving changes and switching back and forth between editor and preview mode. You can make a change and then just hit preview to see how it would look when it is live.
Step 9: Publish Your Website On the Internet

Once you know you are all set, hit the Publish button! But don’t worry – it’s easy to make changes to your site after you’ve published it. Just bear in mind that some builders won’t let you switch templates after your site is live.
Using a Website Builder FAQs you might want to be sure of

How do you create website for free?
Anyone can make a website, so it is necessary you do your research although most of the free and paid website builders had been shared with you, you can come up with a wonderful website by simply signing up with any plans that best fits your needs and budgets from the list provided.
How long will it take to build a ready to use website?
With most websites builders you can create your website in less than an hour. You don’t need to be fast to launch your website or getting all of the settings you want so quick.
Infact with what I recommend is that the best way to create a good website ready for launch is to schedule a free time or a day to make changes with the software and implements the unique standard you want your website to have.
Keep in mind that it can take much longer than a day or just free time to make a ready to publish website– all of this factor depends on how many pages you have and how much customization you need to do.
Can I get ranked on search engines with website builders?
If you build a website that’s optimized for search engines, then yes it will. In fact most website builders provide you with SEO tips and are very secure and regularly updated so that you don’t lose your ranking to a competitor because of failed services.
Be rest assured that since you don’t need to struggle with SEO plugins you can do better by focusing on SEO strategies.
How to create a website that ranks in Google will require good content, and a bit of background research into SEO. Building websites that people can find is key to a good website marketing strategy.
How do I build an ecommerce store regardless of my tech skills?
If you already have a Wix, Weebly, or Squarespace website or any generic website builder you can upgrade to an ecommerce price plan which will unlock sales features and tools.
However, I and other bloggers would recommend Shopify or BigCommerce which are e-commerce focused platforms, offering the best tools for growing your business.
I need the easiest website builder, Any recommendation?
Wix is the best all-around website builder mainly because it’s so easy to use and can build a professional websites for you. It has the most intuitive drag-and-drop design and offers plenty of simple visual cues so you know that what you see is what you get.
Squarespace is best for showcasing your portfolio or services in the best eye appealing way possible, with lots of themes and better editor you can setup useful functions in minutes
Is it possible I move from one website builder to another?
You can and you should be able to carry out that action without assistance but there’s usually a lot of unappealing occurrence involved because most, if not all, of your content will have to be moved to another source all by yourself.
You can be given limited access from website builders, This is the reason it’s so critical to test a couple of competitors before joining any
What software would you recommend I use to create a niche website?
Choosing a website builder depends on what you’re looking for or primarily on your needs. They all have different pros and cons but the best website builders are:
Shopify – best e-commerce store
Squarespace – best for showcasing
Wix – best for business website or blogs
Weebly – best for small business
In what way can I create a functional website?
The easiest and most affordable way to make a website is with a website builder. They don’t require any coding or much technical knowledge, and some platforms even offer free plans.
You can use a CMS like WordPress, most tech beginners don’t find it an option Or you can hire a web designer, but this can be expensive and may take your time.
I want a professional website, how do I get it?
Every website builder lets you create professional looking websites thanks to their sleek templates and intuitive design tools. Squarespace is the best platform for portfolio or design, wix is best for highly functional websites, letting you create truly stunning websites worthy of any web designer, and they offer a 14-day free trial to begin with.
I want to make money online by selling can I make my website do that?
You can build an online store with website builders like Weebly, Wix, or Squarespace by upgrading to their ecommerce plans, which will give you access to their sales tools. However, I recommend you use an ecommerce-specific platform like Shopify or BigCommerce because they have better sales features and you get get expert advice regarding sales and commerce.
What exactly do I need to start my website?
Website builders have everything you need to create a website in just one subscription.
You can add graphics, videos, e-commerce features, contact forms and everything else, without having to spend time on or code, unlike other open source platforms like WordPress, you have to code everything yourself, and organize web hosting and security certificates.
How much is the estimated cost is to create a website?
It depends on what you want your website to do. Website builders have set price plans, but you have to pay for most apps and integrations.
Some platforms, like Wix and Weebly, have free plans, but other platforms can cost anything from $8 – $40 /month.
Are there any platform to hire a website designer?
There are a number of freelancing communities where you can get a web designer that for your requirements from the available talents.
The platform with highest customer satisfaction include:
UpWork
Fiverr
99designs
Toptal
Option 2: Create a Website with Wordpress and Niche recommended tips
How to Build a Website in 8 Steps:
- Decide if WordPress is right for you.
- Choose the right web hosting provider
- Buy the right hosting plan
- Choose and register a domain name.
- Install your WordPress site with one click.
- Choose a theme for your site’s design.
- Create and customize your content and pages.
- Choose and install useful plugins.
- Make final checks and publish.
Step 1: Decide if WordPress is Right For You

Almost a third of all websites are built on WordPress. It’s a subtle, essential part of the internet. But it also requires more setup work and maintenance than most website builders do. The first step of building a website using WordPress is estimating your budget and knowing what you’re signing up for.
WordPress is not an all-in-one software. It’s a free open source Content Management System (CMS). This CMS only allow you to create and organize digital content. All other necessary actions to get your websites working like hosting and web registration should be done separately. It’s up to you to bring these together in service of a WordPress site.
Fear not- despite it not being the all in one package most beginner will go for, I can testify that it isn’t very difficult or hard to setup as you might think, but it’s not the easiest available way to make a website. It is really not for folks with little technical knowledge or for you if you would want to get a working website fast.
In addition, there is a robust and friendly community ready to help you create a website that is dynamic, unique, and powerful.
Step 2: Choose the right web hosting provider
If you are seeking to build a website without taking web hosting services, registering domain names will serve no purpose. Having a web hosting account is very important in order to get a website hosted. A web hosting company makes it possible for your website to be accessed by everyone on the web.
To help ensure your site is optimized for visitors and search engines, you need a high-speed hosting provider like Bluehost, although there are other better alternatives.
See the Google trends report below to the most used hosting provider showing you that Bluehost is going to be the smartest decision to make for easy to use and for efficient service.

On top of that, Bluehost is very affordable with basic plans starting at just $2.75 per month.
Plus, it has some great features:
An easy-to-use dashboard that comes in handy for beginners
Numerous hosting options to choose from
24/7 customer support
Free SSL certificate
Easy cPanel dashboard
99% server uptime
High-end security measures
High-speed servers
1-click WordPress Installation
Recommended by WordPress as the host of choice
Low introductory pricing
Money-back guarantee
Only costs $2.95/month (via my link )
Setting up an account with Blue host is very easy, you just have to follow the simple steps below.
Step 3: Buy the right hosting plan (I recommend Bluehost).
Open up Bluehost Now in a new window and follow up here, the first actions you need to take is to click on the Get Started Now to setup your blog.

Now that you are on the Blue host page, choosing a plan might not be difficult for you since they are several hosting plan for you, so you just select the plan that works best for you.
Blue host offer different kind of service, they have three different hosting option you can choose from, and while majority of their hosting plan includes a free secure sockets layer (SSL) certificate, user’s are given a full year of free domain, and a marketing credits of $200.
The basic Blue host plan: Which is the most popular hosting solution that provides everything a user with no technical knowledge will find easy to get started. The blue host basic plan is an efficient and affordable hosting option for a blogger with a single site.
The plus Blue host plan: It is the best Blue host hosting plan to choose from if you are looking to scale and expect more visitor traffic to your website because it allows you to own multiple website and feature the 30 day free trail of Microsoft 365 email essentials package.
The choice Blue host plan: The choice plan is the biggest offer by Blue host, this plans cover’s every package listed in the basic blue host plan and the plus blue host plan, the choice blue host plan provide it subscriber’s Free automatic daily backups of their, code guard monitoring and restore services and full domain privacy.

Step 4: Choose and Register a Domain Name
Every site needs a domain name. This is basically your site’s unique address. You can get a domain name directly through some hosting providers (like Bluehost), or otherwise you’ll need to get it from a domain registrar like Domain.com, Godaddy. This will typically cost around $12 per year.
Quick checklist to consider for purchasing the a good domain name
There’s no secret formula for choosing a great domain name, but there are a few things you should consider:
- Make Your Domain Name Easy to Pronounce and Spell
You should be able to easily share your domain name when speaking as well as writing. You never know when you’ll be asked to share your domain name in person so make it as simple as you can ever imagine.
- Keep It Simple And Descriptive
A great domain name is something that describes your blog without having to go into much explanation. If you had marketing.com as your domain name, for example, it would be pretty obvious that your blog was based on the concept of a marketing or sales. Keep this concept in mind when choosing your domain name.
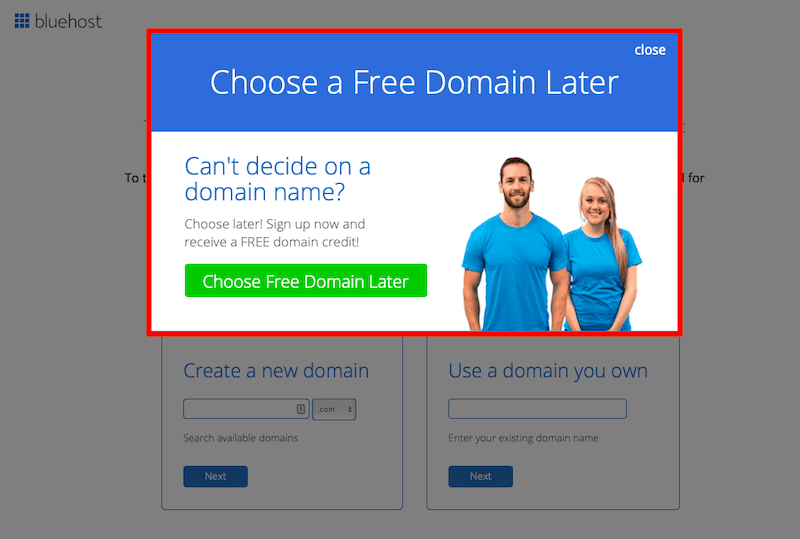
If you’ve already thoughts of your name, then you can add the information here. And if you need a new one, you get your domain name for free for the first year.

If you need more time to come up with a website name, you can always sign-up and choose your domain later.
If you’d rather get one separately, simply go to a domain registry site like domain.com or godaddy, find a name you like and is available, and buy it. It’s that simple. Once you’ve acquired the domain the registrar will give you an account. It’s through this that you can attach a domain to a site.
Once you register a domain, it’s all yours. You should always keep at the back of your mind to always renew the subscription, if you don’t renew you might lose the domain name at which point it will be available for other users to acquire
Step 5: Install Your WordPress Site With One Click
It is here that you enter Your Essential Account Details:
Here are the “Account Information” details you need to enter to create your account.

The details you are required to enter is very essential so make sure to input the correct details, including your first and last name, business name if applicable, country, address, etc.

After selecting your preferred host plan and chosen your domain name, you will need to add your account billing information and complete the package information to complete the setup.
As a Bluehost long time user I recommend you go for the 36 months plan because that is the best value so far.
While selecting your plan you will see optional extras that you can obtain, It is entirely your decision to consider purchasing the extra’s if you really want to.
But I don’t recommend purchasing the extra’s since they can be gotten later on if you decide you need them.

Finally, pick your payment option. Bluehost has flexible payment option’s either you choose to make the payment via credit card or PayPal.

You have successfully registered your hosting plan with Bluehost
Congratulations – you’ve set up your hosting for the first time and you now officially own a website.
Let’s move on…
Once you sign up to a hosting plan with Bluehost, an account will be made for you automatically, though setting up a WordPress requires something from you: a click.

Don’t forget this is where you have the access to install wordpress.
When you have signup to the latest Bluehost version with my link Wordpress will be automatically installed for you.
Which simply means you have to login to your registered bluehost account, and then click the login Wordpress button to get started.

WordPress’s massive popularity means it’s in the interest of hosting providers to make setup easy.
Accordingly, most offer one-click WordPress installation. In the case of Bluehost, that means going to ‘My Sites’ on the dashboard. As you can see below, it’s very easy to find.

If you bought a domain name as part of signing up, a WordPress site will already be there (a no-click setup!).
To create a new one, you simply click ‘Create Site’. Most web hosting providers offer a similar experience
Step 6: Choose a theme for your site’s design
While website builders have templates, WordPress has themes. Your theme shows your visitor what your site is all designs, from it looks or used images and even navigation.
On the wordpress plugin directly you can have access to free themes and paid themes, and you can change your website’s theme as often as you want.
The upside with free themes is the cost, obviously, though bear in mind a nice free theme is likely being used on a lot of websites similar to your pick or niche already. Purchasing a paid themes can make you stand out from other website and can give you the optimal access to tweak its design.
Some only require a one-off payment, while others offer a subscription in exchange for support, updates, and maintenance.
Once you select your WordPress site you will find yourself in the WordPress dashboard.
Your wordpress dashboard is where you don’t only have access to themes you can also find other functions like plugins, new posts or pages and it’s here that you can manage themes. A large number of default themes are available for you to choose from, and adding new ones only takes few minutes of your time.
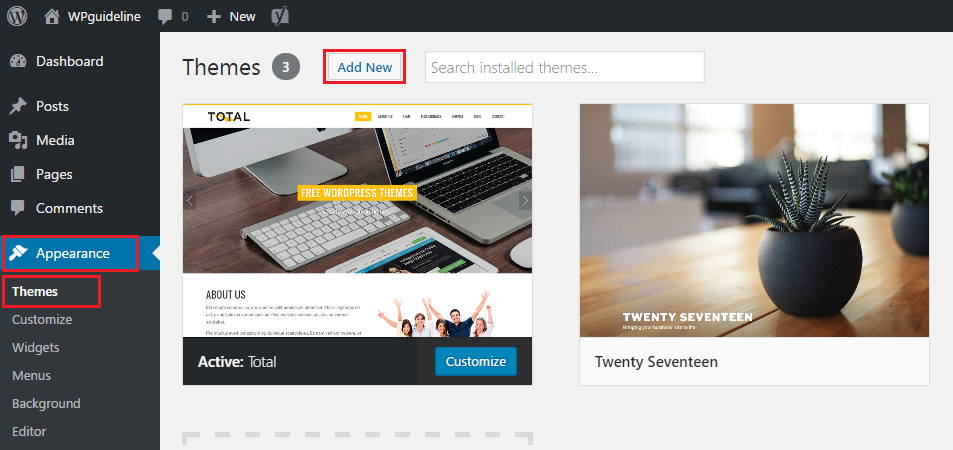
To add a new theme, go to ‘Appearance’ and then ‘Themes’. Click the option to ‘Add New’ to the right, and you’ll be taken to the WordPress Theme Directory to browse a new theme.

There are thousands of templates to choose from in WordPress’ own Theme Directory. Search for the types of themes you’d be interested in.
If you’re setting up a marketing search ‘marketing’, if you need a site for your fashion search “fashion”. You will see dozens of website builders, if not hundreds, of similar theme.
Clicking on a theme takes you to its own page where you can see user reviews and preview the theme in action.
Customization on WordPress requires much more technical skill than it does with website builders. You’ll need to dive into the code to make the changes you want.
If you’re comfortable with HTML, CSS, and Javascript (or looking to learn more about them), this shouldn’t be an obstacle. Be aware that WordPress offers more control than website builders, but only if you have a good technical knowledge or programming languages.
Responsive and easy to use Themes provider’s
Astra

Astra has always been at the cutting edge of WordPress themes, innovative and forward-thinking. If you need a theme that works perfectly with page builders, super simple and fast, and yet has all the power and flexibility you could imagine, look no further than Astra.
Total

Total is developed and supported by WP Explorer, the creators of many exceptional WordPress themes and plugins, it is both free and premium it aims to be non-distended, allowing you to to disable features that you won’t be using most themes don’t offer this option and end up with cluttered interfaces
Ocean WP
OceanWP is a free WordPress theme that can be used as a standalone product or as part of a page builder it is fast, customisable, and friendly page builder, primarily it’s strength is with e-commerce websites and has all the feature that you would normally expect to pay for.
Divi

The Divi WordPress theme is one of the most used themes in 2020, it and enjoys a lot of popularity and positive reviews among both web developers and site owners.
Divi combines great looks with a wealth of impressive features to deliver a truly useful multipurpose WordPress theme. A great range of page templates and an easy to use page builder will suit both those looking for an out-of-the-box solution, as well as anyone who wants to create custom designs without coding
Step 7: Create and Customize Your Content and Pages
Adding content to WordPress is much more structured than you might think.
Content on WordPress sites essentially breaks down into two types: pages and posts. What they look like will depend on the theme you use.
Pages are static one-off pages that make up the backbone of your site. Your homepage and contact page would be pages, for example. Posts are more timely. If your site has a blog, each entry in that blog would be a post.
Creating pages and posts is easy. Both require just few clicks from you in the WordPress dashboard. For pages you go to ‘Pages’ and ‘Add New’.

For posts you go to ‘Posts’ and ‘Add New’. Both ‘Add New’ options will take you to the editor, where you can add content, preview, and publish.

To add pages to your main menu you simply go to ‘Appearance’ and ‘Menus’. From there you can select which pages appear in which menus. For most sites and most themes you’ll only need one navigation menu, so putting one together is easy.
Step 7.2 How to create a homepage

Your homepage is your only chance to get them to stay on your site and become a customer.
And since a company’s homepage accounts for up to 50 percent of the site’s total pageviews, it’ll make or break your business.
- Use Plenty of Whitespace
A good way to deliver an enjoyable experience to your website visitor is to understand more about whitespace and how you can use it to create a nice, simple and elegant design. Whitespace is actually really important to web design because you can use it to improve readability and website performance.
White space is useful for clearly separating text, graphics, and other elements, and prevents pages from feeling too crowded, It can also enhance the importance and distinctiveness of the type and draw the eye to specific pieces of copy.
l Appropriate calls-to-action
Whether you use your CTA to create a sense of urgency or to easily lure your readers toward the checkout line, the important thing is that you use it. Ignoring the uses of calls to action is a mistake that could make your engagements and business growth fail
The main goal of every webpage should be to capture the target audience’s attention in order to guide visitors further into the website, encouraging them to go check out a case study, leave their contact information, or otherwise engage with you
- Be Concise
Show visitors what they’re looking for, show them where to start, and establish your company’s credibility.
You should be able to accomplish everything you need in one to three sentences, as a general rule. This way, you don’t have to worry about them getting distracted — because all they’ll see is your most important copy.
Step 7.3: How to create a about us page
An “About Us” section is an opportunity to introduce yourself on your own terms. It’s also a visitor’s first encounter with the people and story behind your site, and a strong page will transfer your passion on to your readers.
A good “About Us” page starts with the basics, but quickly moves beyond them. Yes, users need to know who you are and what services you provide.
Essential info a about us page should contain
- A reason to trust you: People coming to your website for the first time are primarily interested in what you have to say – which is why we’ve put so much emphasis on how to go about saying it. But when a new visitor is forming his or her opinion of your business, it helps to provide some outside testimony for validation.
- Use testimonials: Testimonials are an extremely important part of the success of your business. On your relationship-building journey, which is lined with credibility and expertise, testimonials from loyal customers are a critical part of the presence of your business.
- Include a Timeline: Has your business been around for more than a few years? Does it have an impressive history of growth and achievement? A timeline can be a great addition to your About Us page. Include all the relevant breakthrough and details about your business.
Step 7.4: How to create a contact us page

A ‘Contact Us’ page is one of the top four most important pages on any website because it is typically one of the most visited site pages for most companies.
It must be easily accessible from the home page. You should put the link to your “Contact Us” page on a prominent (expected) place on the website so that the users could easily find it.
Essential info a contact us page should contain
- They include an email and phone number so that the visitors could quickly find the required information.
- Keep it Simple: You don’t want to put too many barriers between the site visitors and the contact information they’re looking for. Keep your contact us page short, sweet, and to the point.
- They include an email and phone number so that the visitors could quickly find the required information.
You should take “ contact form ” on your website as the backbone of the lead generation. You can grow your business by opting for it.
Many businesses can’t reach success today because they are not designing contact forms correctly or not using them.
Step 8: Choose and install useful plugins.
A plugin is a piece of software containing a group of functions that can be added to a WordPress website. They can extend functionality or add new features to your WordPress websites.
WordPress has tens of thousands of plugins for everything from search engine optimisation (SEO) to image compression. Browse the WordPress plugin directory and you’ll soon get a sense of how vibrant and creative a community it is.
Each plugin has its own page with descriptions, screenshots, user reviews and more.
To install plugins it’s easier to browse within your WordPress dashboard.

To do this go to ‘Plugins’ and ‘Add New’.
There you can sort through featured, popular, and recommended plugins, as well as search for them yourself. To install simply press ‘Install Now’.
Step 8.2: Most Essential Apps and Plugins for a Wordpress Website
Google Analytics

Google Analytics is one of the most powerful tools available and it’s free. It’s very simple to deploy as long as you have backend access to a website.
You can use Google Analytics on a daily basis to track website analytics, behavior flow, conversion, and goal tracking, and build custom marketing funnels infact it is a great tool for tracking overall site progress
Wordable

With wordbable you would love using Google Docs. Since It’s simple yet highly functional, and it’s the best shared editing experience online. Wordable can allows you to fully utilize Google Docs This tool is the perfect example of what a single function tool should be. 100% recommend for an app that help transfers blog posts from Google Docs to Wordpress with the click of a button. It allows you to draft and collaborate in Google docs
Yoast SEO

Yoast SEO is a popular plugin that comes with tons of features to optimize your website. It has built-in content analysis, meta keywords and description management, managing duplicate content, xml sitemaps, social features, rich snippets, and much more.
It also gives you tons of flexibility over your site’s content, letting you set up titles, meta descriptions, and social sharing information on a per-post basis. It can also be an an easy way to set up a sitemap, adds some basic schema, and it is very beginner friendly.
AddThis

This easy to set up, easy to use is a great yet an affordable social sharing tool for adding and tracking social sharing to your blog or website that can primarily help you focus on the social performance of your content.
This tool is always free, customizable, privacy compliant, and designed with your audience in mind.
WP rocket

WP Rocket is a caching and performance optimization plugin to improve the loading speed of WordPress websites. You can install and configure WP Rocket in less than 3 minutes.
This WordPress site optimization plugin is built to help clean up your WordPress database for maximized efficiency. The plugin also works to de-fragment MySQL tables as well as remove data like pingbacks, expired transient options, post revisions, blocked comments.
Smush

Smush is one of the easiest plugins to perform image compression for WordPress. With more than one million active installs, this image optimizer is one of the most popular WordPress plugins in the official plugin repository.
It users has testify it is one of the best image optimization plugin for improving the page speed of your without losing quality
BuddyPress

BuddyPress is to greatly enhance the capability of WordPress in building a community website. It will give your website members the ability to create groups and invite their friends, check activity feeds, create discussion boards while its adapts smoothly to the needs of users,
BuddyPress works just like any other online community platform whether they require additional functionalities or want only the essential features and tools.
Contact Form 7

Contact Form 7 is a free plugin which means it doesn’t cost you charges for upgrade. It has a very simple interface for creating forms, with no live preview of your form while you work on it creating forms it is much easier and more with its drag-and-drop user interface.
Contact Form 7 looks as sleek and minimal and does not use up too much resources on your server and wordpress installation
HubSpot

HubSpot provides tools for social media marketing, content management, web analytics, landing pages, customer support, and search engine optimization. HubSpot has integration features for salesforce.com, SugarCRM, NetSuite, Microsoft Dynamics CRM and others.
Their knowledge and expertise about all things inbound has resulted in a marketing platform that caters to every stage of a successful inbound plan and the buyer’s journey.
Business focused tracking and analytics are available from HubSpot Plugin
UpdraftPlus

This is a WordPress backup plugin that supports more cloud backup options than most other plugins. It is built as a backup solution that highly delivers on speed, UpdraftPlus is commonly referred as the optimal preferred choice, Since it’s highly optimized for server performance, it consumes fewer server resources when compared to most of its competitors.
This all of this WordPress backup plugin is useful for every website that uses the open-source wordpress creating tool to manage online contents.
You can manage your plugins in the ‘Installed Plugins’ section of the ‘Plugins’ tab. There you can edit plugin settings and toggle installed plugins on or off.
Creating a Website with Wordpress FAQ you might need to know about

Is wordpress really free?
Yes, WordPress is free, it’s just that everything around it isn’t. You’ll need to pay for hosting and a domain, and you might want to opt for paid themes or plugins too.
Can I maintain wordpress easily?
You’d be surprised. Once it’s up and running WordPress is pretty straightforward to manage. The real trick is juggling the elements that go into a WordPress site, rather than WordPress itself.
What would you recommend I use, Wix or Wordpress?
Put simply, Wix is much easier to use than WordPress, so it depends on your level of technical skill. With Wix, everything is there in one place for building a website, and you don’t have to use any code. WordPress requires coding throughout the process, giving you unlimited customization.
Why is Wordpress the best CMS?
WordPress is widely believed to be the best CMS because it currently powers 33% of active website, and it’s certainly the most popular one.
What can I know about the difference between wordpresss.org and wordpress.org?
WordPress.org is the CMS version we’ve referred to throughout this article, and WordPress.com is the WordPress version of a website builder. WordPress.org is more complex to set up, but offers greater scope for customization. WordPress.com is simple to set up, but limited – I’d recommend it for blogs, but not much beyond that.
Do I really need a web host for a website?
You will need a web host to create your WordPress site because it’s an open-source platform. However, if you are using a website builder like Wix, Weebly, or Squarespace, you are not required to find web hosting – everything you need to get online is there in one place.
Can setting up a wordpress site be time consuming (for how long is it)?
Most hosting providers provide one-click setup, so you can technically set up a WordPress in five minutes. Setting up a good WordPress site rich in content shouldn’t take you more than a day if you’re clear on what you want to achieve and have the technical know-how.
Steps to Set and Edit WordPress Website Homepage
No business can do with out a homepage, infact it is one of the essential parts of a website. Although, It is an easy task to set and edit the homepage in WordPress.
Having a website with wordpress you should take note that the newly uploaded blogs and posts are displayed on the website’s homepage by default without your attention.
If you own a website mainly for blogs, media or the likes you wouldn’t find it difficult infact it is mostly figured out for you.
Although this method is not adaptable to most website, especially businesses and companies since a static homepage is the most effective way for easier user experience.
For most of these companies and businesses, the homepage of their website should have information about their products, services, in other to tell visitors what they do as soon as possible a blog is needed also in order for visitors to learn about their products but it should come second.
So, it is essential to set and edit the WordPress homepage.

- Here is why you should edit and set your Homepage:
- An edited homepage can help you generate more sales and helps to focus on the services you offer.
- It helps in increasing email subscribers and get more leads because you have made it easier for visitors to navigate your website.
- Most time it is not necessary that you have your blog on your landing page or homepage, editing your Homepage gives you that chance.
- Step by step tips on how to set a static homepage via WordPress

I have mentioned that some businesses like to have the services and products there offer displayed on their landing page.
Some would like to add a product gallery or slider to their homepage and even would like to change the homepage to a static homepage. With all of this mentioned homepage changes. It is possible to change and set the homepage in wordpress to your needs.
Most of the premium themes you purchase require the immediate switch of the homepage to a static homepage.
3. To set a static homepage in WordPress, follow the below process.
- You should log in to WordPress either as an admin or a root user.
- Navigate to the ‘Settings’ option in the left-side menu bar and select the ‘Reading’ option from the drop-down to open your homepage settings.
- In the ‘Reading Settings’ page, navigate to the ‘Your homepage displays’ section.
- If you want to change the display settings from the default ‘Latest posts’ option to the static home page, click the ‘A static page’ option to set the new homepage.
After the selection, WordPress gives two options to you:
- The first option from wordpress is to set the homepage of your website.
- While the second option from wordpress is for the blog posts of your website.
If you there are multiple pages on your website, you can select the pages for the two options from the list.
Take note that you need to create and publish the pages before you are given access to select them.
After all the editing you would like to input, you can now select ‘Save Changes’ in order to have you changes go live. Now, visit your live website to see for your self if the homepage got changed to the static page and errors are not present.
4. Step by step tips on how to Set the Blog Page as Homepage
To set a Blog Page as Homepage in WordPress, follow the below process.
- You should log in to WordPress either as an admin or a root user.
- Navigate to the ‘Settings’ option in the left-side menu bar and select the ‘Reading’ option from the drop-down to open your homepage settings.
- Then, change the display settings to ‘Your latest posts’ to set the blog page as the homepage.
- Note that after the changes from a homepage to a blog page, Your latest post or the changes you want depending on how your blogs need to be arranged or shown can be done by following this steps:
5. Here is how to make your blog post arranged the way you need it to be
- Set how many posts get displayed on a single page in the text bar next to the ‘Blog pages show at most’ option.
- Set the count of RSS feeds in the text bar next to the ‘Syndication Feeds Show the Most Recent’ option.
- Set how the post should appear. If you select the ‘Full text’ option, all the details of the post get displayed on the page. But if you select the ‘Summary’ option, only a summary of the post gets displayed on the page.
After all the editing you would like to input, you can now select ‘Save Changes’ in order to have you changes go live. Now, visit your live website to see for your self if the homepage got changed to the blog page and errors are not present.
Step by step tips on how to Create a WordPress Main Menu

Website menu is a major features to a website, it is how you can make your website easier to navigate, take note that most of the WordPress themes do not give you access to a menu automatically.
- To create a WordPress menu in WordPress, follow the below process.
- Navigate the ‘Appearance’ tab in the left-side menu bar of WordPress.
- Click the ‘Menus’ option.
- In the Menus page, either select an existing menu from the drop-down or click the ‘create a new menu’ link.
- select the categories, such as posts, pages, tags, and more that you want to add to the menu or add a custom link as an item on the menu.
- click the ‘Add to Menu’ button.
- Drag the menu items to reorder or nest the menu.
7. Select the display location of the menu from the list and click the “Save Menu’ button.
8. Navigate to the ‘Manage Locations’ tab to set the primary or main menu and the footer menu from the drop-down. The menu locations vary with each theme.
9. After all the editing you would like to input, you can now select ‘Save Changes’ in order to have you changes go live.
Now, visit your live website to see for your self if the new added menu got changed in your websites and errors are not present.
With this tips you can create and set a menu in your WordPress website. Do take note that each WordPress theme is different and the number of menu locations available in the layout might be different to other themes that you may come across.
Best Free and Paid Tools to Test Website’s Performance

A range of 26%-40% bounce rate does mostly occur with a standard websites.
Recent studies had shown that if a standard website takes more than 5 seconds to load fully for display, then the bounce rate of the website can rise to 70%.
A slow website can have significant effect on the SEO rankings and index both for a mobile visitor or desktop visitor to your website.
There are several reasons that can slow down your website speed, seo ranking and visitors.
The contents of your website, such as videos, images, infographics, and more, can be a factor that affects the speed of the website.
Your webpage loading time is the time it takes your website to load a webpage from the servers and display it on the browser of your visitor.
Your website speed has a significant impact on your user experience, as the average users expect your website to load in just under 2 seconds or even less. If the website is slow, then it can lead to a bad user experience to your website visitor.
In this tutorial, you will learn about the best free and paid tools that can help you to analyze the performance of your WordPress website before you lose seo rankings or deliver bad user experience to your website visitors.
5 Best free and paid tools to test the Website’s Performance
Many performance tools are available for you to use either paid or free to test the overall performance of your website. To help you make the best choice I have handpicked the best free and paid website performance tool you should try.
Google pagespeed insights
This performance tools provided by the tech giant is considered one of the best online tools that help to analyze the performance of your website. Google pagespeed insights provides basic and useful suggestions to optimize your website pages and to speed up the loading time and performance of your website. Google pagespeed insights can anaylyse your website performance on any web browser you are using at the moment.
Google is so supportive that you can get this tool for free without upgrade plan and also getting access to all the functionality that can help you get simple and straight forward results on the speed and performance while testing it on a desktop device or a mobile device.
Your website performance is graded on a scale of 1 to 100 and divides it into different categories as low, medium, and high based on its priorities.

It is always important to check the performance of your website on a mobile version because most of your visitors might be using a mobile device to browse through the web and you might be getting your traffic from a mobile device. So testing it always via mobile version should not be over looked.
The two screenshots highlighted for you are the performance analysis of both the mobile and desktop version of a website.
The First Contentful Paint (FCP) mentioned in both the screenshot with a tri-color bar is the time taken by a website to display or paint the content on the screen.

In the results listed above, the desktop version of the website loads 47% of the website content in less than 1 seconds, and the mobile version of the website loads 35% of the website content in less than 1 seconds.
The second tri-color is the First Input Delay (FID), and that is the time taken by the website to respond to the first interaction.
In the above desktop version of the site, around 93% of the initial interaction responded to is in less than 100ms.
This site also displays different suggestions to improve website speed and performance.
The Google PageSpeed Insights report also displays some of the other parameters affecting the performance, but these parameters won’t directly affect the performance score of the website.
Varvy Pagespeed

Varvy Pagespeed provides extensive reports that are presented effectively and yet very eye appealing. The metrics are well explained and the reports presented to you follow guides to help you understand some important terms you should definitively know about. The guides also provide optimization tips for better performance and load speed.
After you run a test, you are given a summary of the server issues, you web page issues, and other resources. A easy to understand visual representation of the results and as well as the count of resources are displayed to you for accountability.
You are given a very detailed presentation of important metrics such as Image Optimization, Browser Caching, Keep-Alive, Enable Compression, CSS delivery, JavaScript usage, Server Response Time
GTmetrix

GTmetrix is one of the free and most popular tools used to analyze website speed and performance. GTmetrix is said to be famous in the wordpress community and the best overall since it gives you full display on essential yet detailed performance report.
On top of been famous they offer a free signing up to GTmetrix that can unlock several customization options of the tool for your use.
This tool provides diversity in analyzing the content and its rule by generating two different results scales. On the GTmetrix the PageSpeed and YSlow categories display the score based on the generated rules and not based on the website contents you own.
As a GTmetrix tool user you can get seven test locations available for you and you have the options to choose any one of the lists and then also set the test browser to your favourite browser it could be either Chrome, Edge or Firefox. Also, select the type of internet connection you are on before analyzing the website speed and performance.
The two sections of the GTmetrix scorecard are the top tabs and the bottom list. The top tab displays the overall PageSpeed and YSlow score.
The YSlow score mainly deals with the front-end structure of the website, the number of requests, load time, and total page size. And the bottom list displays the performance insights in detail.
The bottom list further splits into different tabs, such as PageSpeed, YSlow, Waterfall, Timings, History, and Video. Each of these tabs displays different performance insights in detail.
For example, the Waterfall tab graphically displays the time taken to load each element, and the History tab graphically displays the previous results of your website.
The GTmetrix also provides an automatic feature to test the loading time of your website at regular intervals.
Pingdom tools

The Pingdom is a website monitoring tool that helps to analyze the website speed. The Pingdom tools have seven test servers on different locations, and you can select the server near to your location before running the test. The major concern of the Pingdom Tools free version is that there is no option to select the connection speed or browser.
The Pingdom tool analyzes and scores the performance of your website in a range of 1 to 100. This tool also displays the load time, the number of requests, and page size along with the performance grade. This tool has a unique feature as it displays the percentile of your website’s performance in comparison with all the websites tested with this tool or platform.
Google test my site

Google Test My Site is a feature of Think with Google. This site gives you the insights you need to optimize your website for mobile devices. This tool is configured to work prominently for website performance on mobile devices.
Having a google test my site tool can also help predict the potential increase in annual revenue when you improve your site speed. With all of this amazing features you can get a reports generated by this tool with a report of all the progress you have had which is available to you at anytime for you to download for free.
Here is a quick-list on how you should categorize your website load time
- A Fast website is expected to load within a second.
- An average website can start to load in 1 to 2.5 seconds.
- Slow website can take more than 2.5 seconds to load completely
With these tools you can develop strategies to boost your website speed against your competitors and if you are a digital marketer or you trade online and you don’t want your bounce rate to rise unexpectedly you should find these tools useful.
How to Add Google Analytics to your WordPress Website

Google Analytics is a free web analytics service provided by the very tech giant Google which tracks and reports website traffic.
This service was said to launch in November 2005 after google acquired Urchin. It is the mostly preferable and widely used web analytics service on the internet as the case may be, with very basic requirements Google Analytics is easy to set up for any kind of website.
To enjoy the most of the awesome services provided by google, you are only required to add a few letters or numbers called codes that google analytics provides to you.
But, if you are using WordPress as your CMS builder of choice, the process to install Google Analytics is very much easier, because WordPress has numerous plugins specially built to install Google Analytics on your website so you don’t go wrong while installing google anaylytics. There are some advanced plugins that you can use to tweak the tracking to suit your needs.
You are here to learn the simple setup guides, you are in the right place.
In this tutorial, I am going to show you how to add Google Analytics to your WordPress website.
To get access to the features of google anaylytics and also configure the analytics in your WordPress website, you would need to create an account in google analytics. In order to make the process easier and avoid wasting of time, let start with creating an account, if you don’t have.
Create a Google Analytics Account
1.2 Log in to the Analytics dashboard using your desired Google account. Once there, you will be asked to create a new property of which you will see a form just like the following image.

1.3 In this form, you will be required to enter all the required information like your website name, URL, Time zone and category.

1.4 Once you are done with the form, click on the Get Tracking ID button given at the bottom of the page you are on.
1.5 Now, It will generate a unique tracking number for your website. Once done, it will redirect you to a page where you can find the tracking ID as well as the tracking code.

Take a look at this screenshot to see where to locate your tracking ID and the tracking code.
You should copy the tracking code so you can add it to your wordpress website of which I would show you the how to below.
- How to a add google analytics tracking code to your wordpress website
2.1 To add the tracking code you should log in to the admin panel of your WordPress website. Move all way to the Plugins option given in the left sidebar and click on the Add New button to search and install new plugins.

In the WordPress plugin repository, search for Google Analytics and install the plugin that is highlighted in the provided screenshot below.
There are a wide collection of anaylytics tools of which you can also use different analytics plugins based on your needs, While the plugin you are being about to be lectured on has the simplest installation method from all other alternatives.
2.2 Install and Activate that plugin. After that, click on the Settings -> Google Analytics option from the left sidebar of the admin panel. On that page, you will see a form with one field and one submit button, just like the following image.
2.3 Enter your tracking ID in the Web Property ID field and hit the Save Changes button.

2.4 Now, Google Analytics will start tracking visitors on your website and will also give you insights for increased visitor engagement. So, this is how you can install Google Analytics on a WordPress website.
What is Website Permalink and the best practices you must try today
What is Permalink?
A permalink is a URL that can tell what a specific web page is usually by a content management system. Permalink is known or that because they are permanent links and are not meant to be changed.
Quicklist of what Permalinks is
1) Permalinks are permanent static links to a web page that is they can be a source url to your post or page.
- Permalinks are very easy to understand since there usually contain letters or numbers which are readable by human.
- Permalinks should always remain unchanged. So that they are less susceptible to link rot (link death).
Link rot refers to the process by which hyperlinks directing your web visitors to your webpages or other resources becomes unavailable permanently.
You should know that such a link that does not work or function like it is suppose to is known as a broken link or dead link.
4) A change in permalink can cause the users accessing the webpage to get a 404 not found error.
5) WordPress uses permalinks to point to the websites using WordPress as the content management system.
- A permalink is a link to a standalone post or page in your website
- You should always use permalinks in order to get indexed by web crawlers and also appear professional to your visitors.
A very important ranking factor is the URLs of your blog posts and pages.
When you add a new page or post, you should see the page editor and can choose the URL you want that can help you tell what the post or page is all about after dot com.
here is an image below for reference:

This text after the .com is what a permalink looks like.
Permalinks are static hyperlinks that will lead your audience to a specific web page.
By default, your permalink is set to “yourdomainname.com/postID.”
This does not only looks unattractive but isn’t the best from an SEO standpoint.
Before you start writing content for your pages or posts, you should make sure to set a specific permalink structure.
From your WordPress dashboard, go to “Setting” —> “Permalinks.”
You can choose from a couple of options. Most website that get large audience daily and rank higher by search engines follow the “Post name” or “Custom” structures below.

The main thing to know is that every post or page your website contain should focus on one target keyword, which should be in the area right after the dot com.

For your website pages or posts, this permanent URL is the only thing that needs to remain unchanged.
You can always change a page or post’s title, meta description, content, and headings, but the URL needs to stay the same, this is because if you get inbound links to this URL, changing it would result in a 404 error and losing that link value as I have already mention initially.
Finally, make sure to save the settings before exiting the page.
How to make your website more seo optimized with 7 simple and effective tips
Most CMS out there are mostly seo friendly ” but there are several changes that can lead to good enhancements that you can make to allow your website to perform better on search engines.
I am mostly going to be focusing on Google as my detailed point of view because Google get very increasing rise in search traffic which other search engines don’t have as close to Google.
Knowing this I understand you wouldn’t argue with me on why you should focus your search engine optimization (SEO) techniques to the best of what is important for helping Google’s search engine crawler and spider which are known as Googlebot to determine what your website is about so that it will be easier for search engines user to find what they’re searching for and what they intend knowing.
- Change your website <h2> tag for the post/page title to an <h1> tag.
The <h1> tag of your website post should be used for the post/page title, and there should be only one <h1> tag per page, so you would need to edit your theme’s header.php file to remove the <h1> tag.
To do this, this may require some additional styling with CSS to make the title look the same as it did before removing the tag. You can avoid the stress of removing or editing your post tag by using an image for the title or logo.
- Use custom permalinks that describe the page/post content of your website.
In the Permalinks area of your CMS admin, select the custom option and use the following:
/yourpostname/
This will include the post’s title in the URL, usually your website permalinks should contain expressions in numerical format and text like format and most time a mixture of this two can can have negative effect to your SEO ranking and even become a source of increasing bounce rate.
Let’s take for instance, if the title of your post is “SEO tricks and techniques,” then your post URL using a permalinks would be:
http://yourdomain.com/SEO-tricks-and-techniques/
3. Make Use of an SEO plugin.
Plugins can help increase functionality so it is advisable you invest in one, the most popular plugins to try are All-in-One SEO Pack (AIOSEOP) and Yoast plugin, both of which are free.
Although they almost work the same way, and there are many reviews and you can get access to “how to” guides that are available that can help you choose the best plugins for what ever requirements you wish to derive
4.) Invest in an XML sitemaps plugin
Your “sitemap” is a file in XML format with a .xml extension. It’s meant to be an accessible list of your website indexable file URLs, and also the dates that they were created, and how often they should be crawled by search engines.
Like robots.txt, the sitemap is mostly placed in the root or around the footer of your website. It should also be named sitemap.xml:
E.g http://yourdomain.com/sitemap.xml
To have Googlebot and the likes notified that you have such a file, you can place the following line in your robots.txt file:
Sitemap: http://yourdomain.com/sitemap.xml
It must be the correct path of your website, not something related or not even necessary.
Infact, if all of this sound like a task you cannot handle manually but you’re using WordPress, you can use a plugin called Google XML Sitemaps to handle the sitemap creation and automatic insertion of the sitemap’s path into your robots.txt file. It’s as simple as that.
- Make Use of a caching plugin
A caching plugin is necessary and important especially if your website receives a lot of visitors.
Making use of a caching plugin will help make your web pages load much faster, which can help to also enhance the user experience to the level your bounce rate would decrease and makes your website very seo freindly and also attract search engines spiders because your website page load time is now used as an SEO ranking factor.
You should try W3 Total Cache because it is the most popular plugin mainly used for website caching.
6. Develop a meta descriptions that contain your page keywords, but also an I want to know more descriptions, that will make actual visitor want to click over to your website.
Most time the keywords that a user searches for will show up in bold in the search results, which makes them stand out more from other results, and your description should be so enticing in such a way that makes the user want to click on it.
Infact writing an effective meta descriptions is usually considered as a rare knowledge, but if you’re good at hitting the emotional button of your readers and making them want to know more, you may receive more visitors to your website unlike if your meta description for a post or page is so generic and boring that visitors may have to try other website just because you gave a wrong impression at first through your meta description.
If you decide to invest more time on making a eye catching meta description know that it is no longer relevant for SEO ranking and it may no longer be evaluated by Google or search engines in terms of SEO, but having the right meta description may be useful for achieving a higher “quality score” on pay-per-click (PPC) landing pages.
7. Make use of an SEO-friendly theme
As CMS availability increases and the race to deliver a comfortable user experience to a website visitor is usually done by picking an eye appealing design.
Many themes today rely heavily on graphics that can eat up resources and an abundance of JavaScript/JQuery files.
Having an eye appealing design may look fancy and might be considered as top notch, but going for this style of design can make your website load slowly which can hurt your SEO ranking and increase visitors bounce rate.
Infact most visitors don’t care about your fancy theme so for SEO purposes, your theme should be clean and simple, without a lot of graphical design elements that require huge .js files in order to function properly.
Do as much to stay away from using external .js files because external scripts can slow down your website load time even more, especially if the domains where your theme scripts are hosted are experiencing technical problems.
How to Change Footer Text in your WordPress Website

WordPress is the most flexible content management system ever built with an increasing number of free plugins an themes in ts repository that allows its users to a different functionalities and designs to their website wordpress is definitely a great pick.
Builing a website is another issue but knowing what to edit is another, One of the most important area of your website is the footer.
It is advisable that you also consider tweaking your footer to the standard you would want to derive from your website.
WordPress does not provide it users an option to update footer text. However, some themes might allow you to update Footer text without working on the PHP and HTML code. You can check if your theme provides an option or not in the Appearance -> Customise option from the left sidebar.
Many of the free and paid themes available does not provide an option to edit footer text including the default WordPress themes.
But with this guide you would learn how to update your footer text in wordpress in the simplest form although you need to gear up your technical ability for this settings because it requires you to have a little bit of HTML and PHP experience.
If you do not have any prior experience with PHP, you might break the code and the whole site will face downtime. So, make sure you understand what you are doing. Having known the requirements and the consequences of doing it all wrong let’s dive in into the action of the day
1.1 How to change footer text in your WordPress Website
1.2 To change the footer text in your wordpress website, you need to Log in to the admin panel of your WordPress site. Then, click on the Appearance -> Theme Editor option from the left sidebar.
A screenshot is provided below for you to take note of, See the following screenshot for reference.

Now that you are here, a list of files in the right sidebar is what you will see. All the files in the list are the very essential part of your current theme.
Any change in any of the file will affect how your WordPress application works and looks.
In this case, look for the footer.php file from the right sidebar and click on it. It will show you the code just like the screenshot display below.

Having this access to the footer.php file you can now update the footer text to any words or phrases you would find more relevant and effective in any wordpress theme.
Having a basic or pro knowledge about PHP can help you go further by making it dynamic.
How to add HTML to a WordPress Website Page or Post

WordPress provides Visual and Text options to edit your articles or content. In visual mode, you do not have to write the tutorial in HTML.
While in the Text mode, you have to manually type the basic HTML to create the content.
You should take note that WordPress does not provide you with an option to enter HTML snippets in the content.
You can use the basic HTML in Text mode but it is not recommended to use it for complex or custom HTML snippets.
You would find in this part of this article how to input any type of HTML snippets in content. To make this a success I would use a popular plugin called the Insert HTML Snippet to create HTML snippets and inserts them into the content using short codes.
Without much theory let’s dive in to how to add HTML to a wordpress page or post.
Below is How to Add HTML to a WordPress Website Page or Post
- You would need to log in to the admin panel of your WordPress site.
- You should click on the Plugins -> Add New from the left sidebar.
- In the search bar, search for Insert HTML snippet. Having found the right one you should then Install and Activate the plugin.

- Your plugin should be active after the activation, click on the XYZ HTML -> HTML Snippets from the left sidebar. On this page, you will see a list of snippets available in your WordPress installation. Then, click on the Add New HTML snippet to create a new snippet.

- Having click on create a new snippet, On this page, you will see a title field and the content text area, you are required to enter the title in title field.
Then, create or paste your HTML code in the text area.
Once done, click on the Create button given at the bottom of the form.
Having done all of that, you will see your new HTML snippet in the list of available snippets. Under the Snippet Short Code column, you will find a short code for that snippet you created.
You can simply copy and paste that short code in your WordPress Page or Post to display the recent snippet.
This plugin is not only use for your posts or pages infact snippet plugins have a very wide range of uses, You can use this plugin to create snippets for banners, Adsense code or any other advertising code.
How to Show or Hide Widgets on Specific WordPress Websites Pages

Widgets are the very basic features many, if not all of the wordpress website possess, Widgets will allow you enabling additional functionality to your website pages.
Since widget is considered a main features that comes in many themes it would definitely be shown in every page of your website. It’s actually an advantage because of the extra functions that you can add but sometimes, it may give a negative impact especially if you don’t have a needs in having a widgets displayed on your website.
- What is a Widget?
A widget is a block that will do specific functions on your website. You could place these widgets in spaces like sidebars, footers, etc. A calendar widget is shown as an example below. The primary and most attractive feature of Widget is it will be there on any pages of your website. Sometimes this may impact your website negatively.

There is no way we can decide on which page a widget should be displayed. This is the default settings.
Right in this guide it is possible to show/hide widgets on pages you would like. I am going to be guiding you on how to show or hide a widgets with the help of a plugin ‘ Widget Context’.
With the help of this plugin you can now manage each widgets all by yourself while you could choose which widget should be displayed on which pages you would want it to.
- How to hide/show a Widget in a wordpress website
2.1 To hide or show a widgets you would have to login to your wordpress admin and search for install a WordPress plugin called “Widget Context”.
2.2 With the help of widget context, you can configure which Widget should be displayed on a specific page in your website. In order to configure which widgets should be displayed on a specific page in your website you would have to go to the Appearance >> Widgets from the dashboard.

2.3 Now you can see the list of available Widgets. click on the desired Widget. Here, we are taking the Calendar Widget as an example.

2.4 When selecting the widget, a pop-up window will be shown which will contain available areas you could place the Widget. You need to select the desired area and click on the button “Add Widget” to proceed.
Now you will be redirected to the next page, available options for the Widget will be present. You could select the preferred option from the listed options.

2.5 You could click on the drop-down menu to view available show/hide options for the Widget.
You could select from four options from the menu. The options are shown in the below screenshot.
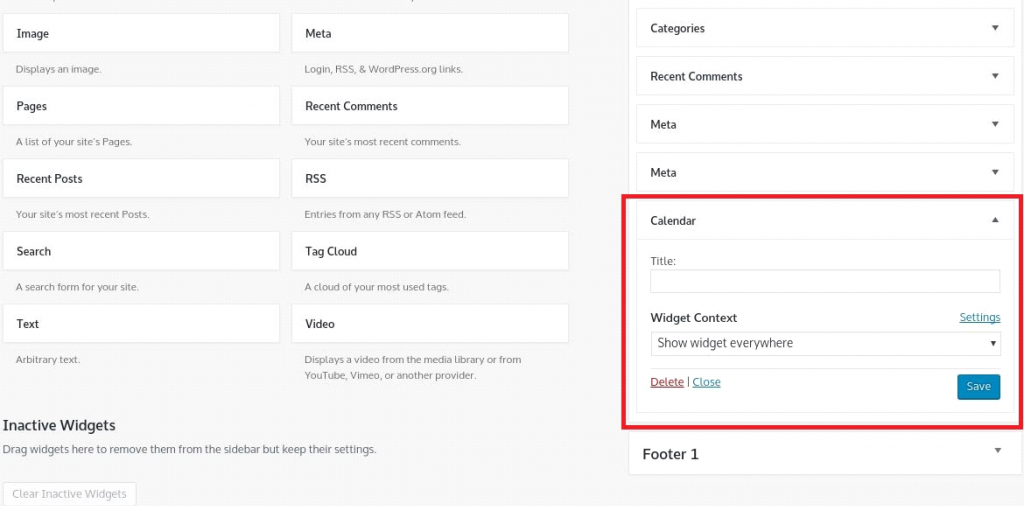
2.6 To make the widget displayed in specific pages, you could either select the second or third option and tick the checkboxes beside to the desired pages to show/hide Widgets on the pages.
After selecting the options, click on the button “Save” to save the changes made.

How to create Sitemaps and the basics for beginners
If you want your website to show up in search engines and your visitors to be more responsive to what you offer, you should seriously consider adding a simple feature known as a sitemap to your website. Sitemaps are very easy to set up and can help you optimize your website for search engines like Google, Bing and Yahoo, and other search related terms as well as assist your website visitors who want to quickly discover one or two things on your website while having a glimpse on whatever it is that you offer by simple navigation provided.
- What is a Sitemap?

A sitemap is a file that lists all of the URLs available on your website; to a better understanding of what sitemap is we can call it’s a page on your site that links to every other page on your website.
- Tyes of Site maps you should know about
2.1 HTML sitemaps
2.2 XML or Google sitemaps.
An HTML sitemap allows your website visitors to see all of your site’s contents with just few navigations, and an XML or Google sitemap shows search engines the entire structure of your website.
HTML sitemaps should be visible and accessible to every of your visitors who visits your website and are usually linked to on the bottom of every page in a website, whereas only search engines can see and understand XML sitemaps.
This two kind of sitemaps will help your site get indexed or “added” to listings of search results for seo ranking and online visibility.
In addition, XML sitemaps help search engines access the very rare to come across pages of your website—that is, pages that they may not have found or would have found much later—as soon as possible, which is a major benefit for your new website that will be updated regularly.
Having set up a sitemaps that can be accessible, sitemaps can indirectly increase the chance that people will find you when they type relevant keywords into Google and other popular search sites.
2.How to Create a Sitemaps

If you lack technical knowledge in creating a website you should find it easy to do that since creating sitemaps is a simple but yet effective process.
However it is important to note that HTML sitemaps can be created manually irrespective of technical exposure.
Even though it is possible to do this, it would be difficult for you to go through your website just creating links to every single page, because you are simply using up time and resources that might be useful in other ways like adding value to your contents or even developing strategy to generating traffic to your website.
I know you would love it if a simple method is provided for you to explore, the best solution is to find a free program or plugin that would automatically scan your website and generate an effective sitemap for you. Simply use Google or another search engine and type in the words “create an HTML sitemap.”
XML websites can be very easy to create. There are many free browser-based and downloadable programs that can automatically generate XML sitemaps for your website. In order to do this, simply search the words “create an XML sitemap.”
In addition, if you’re using WordPress to build your website, there are good numbers of plugins available that can generate both HTML and XML sitemaps for your website at a go.
Many of these plugins can be found without stress by searching for sitemaps plugins on the wordpress plugin directory.
Having followed the procedure and you have successfully create your sitemaps, you should upload them to the root folder of your website.
Take it into consideration to link your HTML sitemap on many more pages of your websites to allow easy access by either search engines users a.k.a your website visitors or search engines like google, bing, yahoo and the likes.
Here are the listed steps you need to follow If you’re using a WordPress plugin.
- Using a Webmaster Tools for sitemaps

Now that you have create your XML sitemap, you need to submit your sitemap file to search engines. Infact one of the preferred and effective way is for you to make use of this free resources that I have mentioned above which is Google Webmaster tools. Having make use of this resources you can immediately alert Google about your XML sitemap and have the Google’s spiders crawl your website in order to discover contents that can rank better on the search engine.
Bing search engines allow has a resources of webmaster tools that you can use to submit your website XML sitemaps.
I want you to understand that submitting your XML sitemap can usually be once.
After submission I urge you to leave the search engines to keep returning to your website and also look for newly updated posts or articles while search engines will pick up on the regular changes and updates you have made to your websites.
If major changes to your website structure are made however, it may make sense to create a new sitemaps and revisit webmaster tools to make a new submission for your website.
Sitemap can greatly improve the performance of your websites because you would make it easy for your website visitor to come across or see what you are all about all in a glance and also giving search engines a very easy way to crawl through your website contents without limitations.
Considering all of this benefits, sitemaps are easy to generate and are easy to submit to search engines.
Basic Search Engine Optimization Guide for Beginner

So now you have build your website so what next? I believe you want your contents to rank better on search engines
Here is a quick list on important SEO terms :
Index: Search engines stores all web pages that it knows about in its index. The index entry for each page describes the content and location (URL) of that page. To index is when search engine fetches a page, reads it, and adds it to the index:
Crawl: The process of looking for new or updated web pages. Search engines discovers URLs by following links, by reading sitemaps, and by many other means. Search engines crawls the web, looking for new pages, then indexes them (when appropriate).
Crawler: Automated software that crawls (fetches) pages from the web and indexes them.
SEO: – Search engine optimization as a simple term refer to the process of making your website better for search engines and search intents.
- Create unique, accurate page titles
A title tag tells both users and search engines what the topic of a particular page is. The title tag should be placed within the head element of the HTML post. You should create a unique title for each page on your website.
- Create good titles and snippets in search results, Using the “description” meta tag
A page’s description meta tag gives Google and other search engines a summary of what the page is about. A page’s title may be a few words or a phrase, whereas a page’s description meta tag might be a sentence or two or even a short paragraph.
Like the title tag, the description meta tag is placed within the head element of your HTML document.
- Use heading tags to emphasize important text
Use meaningful headings to indicate important topics, and help create a hierarchical structure for your content, making it easier for users to navigate through your website.
- Navigation is important for search engines
The navigation of a website is important in helping visitors quickly find the content they want. It can also help search engines understand what content the webmaster thinks is important.
Although major search results are provided at a page level, search engines also likes to have a sense of what role a page plays in the bigger picture of your website.
Most Simple and Effective Method on promoting a Website

- Make use of google my business:
List your business for free with Google My Business, so when potential customers search local businesses or look on Google Maps, your business will show up, complete with hours, location, reviews, etc.
Make sure your listing includes a link to your website. Remember that registering with Google’s business directory is a smart move that can improve your search-result visibility for your website.
- Develop contents for video sharing sites:
Developing videos and engaging users with your content on youtube can spread your content and hyperlinks for your website.
You could embed it on your blog and distribute it in your social media accounts, and so can different users.
Make sure the description links to your internet website consist of a name to mention inside the video — ideally one that takes visitors on your website. Having your videos on youtube can also help you generate continuous revenue.
- Make use of social media:
While platforms like Instagram are great for photographers and fashion stylists, Medium is the platform for readers.
Anyone can write and publish a story or blog post on Medium, and other users find, comment, applaud, and interact with articles and authors.
Even if you have your own blog, networking and publishing on Medium by posting unique content, not a redo of posts from your blog to increase visibility for your business and attract more traffic to your website.
- Create a Webmaster Account
Set up webmaster accounts with both Google and Bing and other search engines, ideally as soon as you set up your website. Doing so makes sure your site is indexed with them and will be included in their search results, and it will allow them to communicate with you about any problems or recommendations for your website.
- Start implementing Link-building
Whenever another site, especially an established and authoritative website, publishes a link to your website, it’s more likely that your website will be found by search engines and potential readers. Links back to your site are called appropriate backlinks.
Just few link back from this source should be enough to ensure your website is found, but the more backlinks to your website, the more valuable search engines will perceive your website— the advantage of this is that you would rank better on major contents.
Another easy way to get a reputable backlink is to make a respectable and insightful comment on a popular blog, it should be a highly respected and a website that ranks well on search engines relating to your niche.
Most blogs will let you include a link to your own site with your comment.
- Create Your Own Infographics
Infographics are clickable and shareable. They are great sources of backlinks to your site, and they are can be simple to make on websites like Infogram and Canva.
When designing infographics and incorporating them into your website, keep your entire audience in mind; make sure the graphics are accessible to all users.
- Develop an email list:
Email marketing is a high-impact, low-cost way of delivering your marketing message to current customers and prospects It essentially involves collecting the email addresses of any and every potential customer and then sharing content — newsletters, promotions, discounts, and information — as a way of building relationships.
Building an email list is still one of the smartest things you can do to start – and grow – your business
Complete beginner guide on how to make money on a website on any niche

- Offer consulting services
Another option to monetize your website is to offer consulting services. This is a good idea if you want to put your strengths at value and offer consulting to different companies, in exchange for money.
A short presentation of yourself will instill trust and build your credibility as a consultant who’s worth paying.
- Sell ad space
Instead of acting through third parties, you directly sell advertising space to media buyers. Therefore, 100% of the advertising budget will go directly to you.
No more bothering about traffic, visits or conversions. However, it may require in-person meetings and negotiations that will, however, pay dividends in the long run.
- Get involved in Sponsored posts
This is a great way for your brands to get in front of the audiences that are trying to target. And this a great way to make money blogging.
However, it’s important that you notify readers somewhere on the article page that it is a sponsored post and that you received compensation for writing it. In addition, you need to make sure any links are “no followed”, and Google will then be okay with the sponsored post.
- Create a piece of software or course
A lot of people are drawn to creating online courses because they know that they are profitable. While the money aspect is exciting, that’s just one of the many reasons that you should create an online course, you can create an online course which can be your area of exposure to your network.
You can tell your readers what you actually feel or your area of expertise about a certain subject, it can be anything you can create a course about.
- Direct affiliate programs
Registering directly on affiliate programs can be done at a low cost, meaning you can get started quickly and without much hassle. There are no affiliate program fees to worry about and no need to create a product
However, if you are in a certain niche, you will know the types of products that your visitors might be interested in.
As a result, just do a quick Google search to see if those companies offer an affiliate program. Just type in “company name” + affiliate program, so something similar to find results.
Would a Website Builder or WordPress be a great pick for you?
Website builders are built to help you get online fast. They’re easy to use, don’t require coding knowledge of any kind, and has good amounts of templates for any niche pre installed to make your website design.
WordPress can be time consuming because It’s an open source platform so you’ll need to get major functions ready yourself, and organize web hosting and other major features.
Although, WordPress gives you total freedom in terms of creativity, but demands more technical skill than website builders.
Below is a well summarized comparison to help making decision even easier and better
| Website Builder Pros | Website Builder Cons |
| Beginner FriendlyEasy to use without coding Available customer supportsAutomatic Backup | Prices varies (might be expensive)Limited templates and designsNo room for advanced creativity |
| Wordpress pro’s | Wordpress cons |
| Unlimited customizationPopular and reliable softwareOver 54,000+ plugins availableLarge helpful supports forum | It is difficult to estimate expensesNot suitable for tech beginnerNo dedicated customer supportRequire’s add-ons for site updates |
With the information shared with you, I believe you can boldly take actions on getting your website ready, although it all comes to your needs and the level of your tech knowledge.
Starting a website gives you the freedom to share your expertise, show your self online and carry transactions efficiently, So focus on getting the process done no matter the limitations or doubt you have towards the available options. Just Do It…
Would you like to be helpful to other reader with your area of knowledge with starting a website? Please do share and if you would like to ask questions the comment box are for you.
How to Start a Website Answered FAQ
- How can I make my website optimized for mobile and multiple display?
Most website builder templates and CMS themes automatically comes with a mobile-optimized version that would provide better user experience to visitors, although be sure to test your website by sharing the pre launch website with family or friends to see if the display is how you need it to be.
2. I want a professional website, should I use a website builder or hire a web developer?
Many business or professionals who needs to get online quick make use of website builders because there are easy to use, requires no coding and there are support teams available, while hiring a web developer can be great if you need your website to stand out and you have plenty of time to test , test and test.
You can explore Wix marketplace to find a certified web developer freelancer or agency if you need to build a custom website that suits your budget that doesn’t break the bank.
3. I want a free website and a custom domain name, how do I do that?
You can create a free website with the best websites builder listed in this article that usually come with a free domain. But in other to look more professional and promote your brand you would need to invest in getting a domain name because it helps build trust as an authority and can help visitors find you online.
You can start building your brand by using your custom domain in for example a custom email address (contact@promarketing.com), your social channels, email marketing campaigns and more.
- I want to include my own backend coding (like in php), Can Wordpress or any other site builders allow me do that?
Many free CMS like WordPress is the best option if you need to your own backend coding – using a free CMS gives you major control and customization over your website that allows you to code. Are you a lover of coding?, you can add custom code to WordPress and other CMS using a plugin.
Although some website builders can allow you to code Squarespace for example does a great job for allowing you add custom codes, – there’s are many limitations when choosing to code on this with website builders, With squarespace used as an example you can still add custom code, code injection, client-side code into website created with Squarespace , but with no access to server-side code.
As a pro coder or if you have basic knowledge with coding languages and you wish to derive freedom with coding you definitely cannot go wrong with going for wordpress or other CMS, be sure to register your website with Bluehost for better experience.
5. How can I create a simple one-page website?
A one page website is best for portfolio display or just a contact form page, for a website like this I would recommend you go for Wix and Weebly because they are easy to use if you are a beginner, there provide a good selection of high quality templates that would be great for a simple one page website that are generally simple and are user friendly
6. Why should I focus on a niche website? Many business you witness them grow but you see them out of business is as a results of not having a focused niche, A niche is simply your area of expertise where you stand out and can in the process know who your targeted audience is.
When starting a website the first thing to note is that you really have to decide on your niche especially if you need to gain large audience traffic or you would like to monetize your website
Many profitable niches that are worth trying are lifestyle, art, business growth, technology, health, fashion, news, making money guides.
7. Is Website builder or Wordpress better for e-commerce or multi-purpose website ?
Website builders can help you with whatever reason you have for creating a website, Wix is best for small and medium businesses, Squarespace is best for portfolio display while Shopify is best for e commerce although WordPress.org is totally customizable with the help of paid or premium plugins, if you have a good amount of time to learn and test features wordpress.org would do just great but you would have to consider the cost of plugins, hosting and themes before you decide on going with wordpress.
- Is it really easy to build a website as a beginner?
Yes it is easy to build a website as a beginner you can either consider investing in a website builder that works well with your purpose or you can consider investing in a web designer if time is what you have and the cost of hiring a website designer is not a problem.
- I don’t know how to code, can I still create a successful website?
Choosing a website builder like Wix, Squarespace and Shopify does not require you to learn coding or have any coding knowledge in other to get a successful website running.
So if you are a beginner you can go through this article with a list of website builder by comparison is provided that can suit your budgets.
- How to create high quality images for my website?
Creating a high quality image is easier than before with the increasing number of free stock images provider you can definitely get one that can fit inline with your contents.
Since you know it is important to focus on providing value to your audience by creating image optimized articles it is wise to invest in one or two stock image provider (you can find a list in this article).
- How much does it cost to build a website? Website building cost depends on the purpose and the option you would like to go with, a low cost website can be from $90 and up to $200 in just 4 years, if you are just on a start, a shared hosting is recommended and prices can range from $0.80/month to $3.45/month, with a domain name which usually cost up to $10 per year.
For high investments website it’s may cost $470 and up to $2000 in just four years, if your website is a large investments a cloud hosting is recommended and price can start from $7.45/month.
Other things to consider than the hosting and domain names are plugins, themes, marketing strategy, your developer team or people that could work for you on your business and other additional features like Extended Validation ssl certificate, Email services and premium cloudflare.
Depending on the website, it is best to plan your budget before hand so that no unexpected expenses would catch you by surprise, as it would save you time and money
- How much does it cost to build ecommerce website ?
An e ccommerce website is like having a real physical business with seen and unforeseen expenses, in other to help with providing value at first hand the is a breakdown on how much it cost to start an e ccomerce website.
There are good available e commerce website builders like shopify, bigcommerce, oberlo that provide high quality services. A starter website hosting plan can cost an average of $29 per month, although other factors affect the pricing such as ssl certificate, a custom domain name, payment processor and other external functionalities you would like to own.
For a complete review on e commerce website be sure to find in this article the complete breakdown on the pricing.
- How to build a real estate website? Becoming a successful real estate agent is directly related to the amount of effort you put to make it a success. You should know that each state has different requirements for realtors, so be careful to follow the guidelines specific to your targeted state.
Choose your perfect niche: Many successful real estate professionals can boldly tell you that you need a niche in order to find new customer and stand out from the crowd.
For example, if you have previously worked in the community developments industry, you would be successful and will be able to create policy that will be to the concerns of community home owners in a way that other real estate professionals cannot.
If finding the perfect niche is difficult to come up with, You can get started with this 792 real estate niches ideas to start with
Choose the perfect name that resonates with your audience: A perfect name is very necessary especially if you have a broad niche let’s take for instance you want to provide consultations to residents in Brooklyn it’s wouldn’t make sense to use (Tom knows best) as it’s doesn’t sound professional and does not tell in an instance who your target audience is. A better and perfect name can be (Brooklyn homes).
Choose your hosting provider: Hosting provider’s like Bluehost and WP engine are great for website with heavy traffic as your website would definitely be of high traffic.
Choose your theme: If you are using a CMS like wordpress you would have great available options to already made themes for real estate blog and if it is a website builder a good number of templates is available for use.
Other quick list are:
- Brainstorm ideas on how to monetize your website
- Establish credibility with your potential customers by updating your website with educating contents.
- Add basic contact me or about me information on your website
- How to build a photography website ?
Your photography website can be your online portfolio that you can use to show your professional standards in photography and give potential visitors which might result to your customers a gallery of free or paid images to observe.
Choose your perfect niche: You can’t argue the reason why you need a niche as a professional, in order to monetize what you do and stand out from the crowd, you simply need a profitable niche. Your niche could be for travelling that is you take photos of sacred or adventurous place, your niche might be for cool technology gadgets do you have love for new technology gadgets or you are just possessive of tech gadgets you should definitely become a technology photography, other kind of profitable niche can be food, lifestyle, interviews and many more.
Choose the perfect name that could allow you stand out: Photography is a very lucrative and a broad skills because every one has access to a device that can either take advance photos or edit photos professionally.
In order to stand out and make money from what you do, you should pick a name. A simple name can be (animals on the rescue) or if it is a targeted location (Houston scenery).
Choose your hosting provider: A photography website is suppose to be host on a secure and quality hosting provider due to the large amount of media contents in your website. Bluehost and Siteground can do the job very well with a hosting plan that doesn’t break the bank.
Choose your theme: A theme is basically the back bone of your website so it mustn’t be over looked, there are themes available for any kind of photography niche you wish to go for provided you search for the right one and read reviews to know it’s weakness. Squarespace is the best website builder for photography and creative website.
Other quick list are:
- Brainstorm ideas on how to monetize your website be it by subscriptions to access your full work
- Establish credibility with your potential customers by updating your website with educating contents mainly like how to use photography softwares, devices and basic how to’ guide.
- Add basic contact me or about me information on your website for easier connection with your potential customer
- How to build a dental website?
A dentist website can come in various ways depending on your level of expertise, who you want your target audience to be and the services and contents you would like to provide.
Choose your perfect niche: As a dentist your profession is the most lucrative but yet very sensitive occupation to be involved especially if you decide to own a niche. A niche can make you stand out and help tell target audience or potential customers what you deal it. Could it be sore gum, or you deal with teeth removal or removal or even if you care for young persons like babies and teenagers. All of this is relating to a niche, that is you will never go wrong for going for a niche.
Choose your perfect name: A perfect name can be a way that people see you as an expertise, imagine you start a dentist website with the name (doctor cure all) this name is definitely hilarious and would scare away potential customers to other dentist with a better name like (healthy gums). So before deciding to launch a perfect dentist website choose a perfect name that resonates with what you do.
Choose your hosting provider: Bluehost and Greengeeks are best for website like this that can hold a lot of patients files, so you definitely would not go wrong by selecting one as your choice.
Choose the right theme: Theme can tell a lot when a visitor visit your website, if you deal mostly with the teeth, it would be nice to see a theme with happy smiling white teeth people as a major means of attraction.
Other quick list are:
- Brainstorn ideas on how to monetize your website be it by proving healthy teeth guides, health medications or guides.
- Establish credibility with your potential customers by updating your website with educating contents mainly like how to care for some path of the mouth, how to use teeth related devices and how to make the right purchasing decisions for teeth self care.
- Add basic contact me or about me information on your website for easier connection with your potential customer
- How to get first 1000 visitors to your website ?
Getting your first 1000 visitors can be very possible in a simple way. In order to do that, start with:
- Create contents that can solve your visitors problem and help them get better knowledge than they would have gotten from in other sources.
- Start building wide social media presence, like a group chat, a page and other online actions you can take. Then you can use this to share links to your new posts or any updated contents you need people to be aware of.
- Be focused and provide information based on your niche, a niche is what you want your potential customers to know you for, so be consistent and don’t move to other areas just because you feel other niches are lucrative and are worth trying. Doing this can hurt your customer base because your potential customer will not want to relate with a random person.
- How to increase traffic to your website ?
- Share other related professionals contents or website that you love on your social media handles.
- Implements the use of target keywords and practice basic on page SEO for your website contents.
- Use graphics like infographics and the like to represent written words, doing this can make your content interesting and can result to a stand out from your competitors.
- After implementing all of the seo advice then you still see a rising and falling increase in traffic, you definitely need to buckle up and set analytic to see what is working well for you, then you do more of those things
- How to start a health and fitness website ?
A health and fitness website can be ranging from providing how to’s advice, nutrition advice and even health related tools.
Choose your perfect niche: A niche can help you determine what type of audience you would like to provide service to. For example it’s could be people wanting to learn how to use certain health tools and softwares, it could be does interested in losing weight or going on a diet or simply providing health advice for health complications victims like the elderly one’s, people with cancer or people with rare diseases. It all bounce back to your level of expertise.
Choose a name that should be of difference: Are you an health consultant or you just love talking about health or fitness? You definitely need a name that can help bring in target audience. A name for cancer patients from a Phd health consultants can be (Curecancer) instead of a random name like (Dr Thomas) all of this are also back to your true purpose and how you would like to present your self.
Choose your hosting provider: A hosting provider like Bluehost and siteground can help with providing a faster load time and can keep your website secure from external attackers who would like to gain unauthorized access to customer details.
Choose the right theme: A right selected theme can help you promote your website even when you are not there, so it is wise to choose a design based on what your services are and the location you intent to serve.
Other quick list are:
- Brainstorn ideas on how to monetize your website be it by selling fitness guides, health medications or guides.
- Establish credibility with your potential customers by updating your website with educating contents mainly like how to care for some path of the body, how to use health related devices and how to make the right purchasing decisions.
- Add basic contact me or about me information on your website for easier connection with your potential customer
- How to start a finance website ?
Finance niche is definitely a trending topic with lot of niche’s under it, niches like budgeting, investing and debt paying are common niche’s you can start with.
Choose our perfect niche: Your niche can be all about making money guides for young adults and men, financial empowerment’s for women or the elderly and even investments plan.
So a perfect niche can help you stand out from the so called professionals with random niche.
Choose your perfect name: The power of a perfect name when deciding to create a website for finances cannot be overlooked because you have helped create a bridge for your target audience to help pass through by proving a name that matches with there and your own purpose.
For example a name like (financetips) can tell a lot of difference compare to a random name like (growmoney).
Choose the right hosting provider: Hosting provider can not be compromised because you would want a website where all your financing tips can be hosted securely without lossing access to mny of your published strategies, Bluehost and WP engine can help you get started with inexpensive pricing plans.
Choose the right theme: There are a lot of themes and templates available for you to pick from. For example if you provide tips on how to calculate income taxes your theme is expected to be designed with calculators or other accounting related images or design.
Other quick list are:
- Brainstorm ideas on how to monetize your website be it by providing investments guides, finances software or basic finances guides.
- Establish credibility with your potential customers by updating your website with educating contents mainly like how to save up cost when starting a business, finances softwares and tools.
- Add basic contact me or about me information on your website for easier connection with your potential customer
- How to start a restaurant website?
Starting a restaurant website is a whole lot of interesting experience. Because humans can not survive with out food consumption which can be resulting to a large number of potential customer. But it is wise to decide on what particularly are you providing, owning a restaurant can give you options to select from whether a coffee shop, a baker shop or a food restaurant and many more.
Choose your perfect niche: Many restaurants owners argue with owning a perfect niche for their business, there believe they can just venture into any interest of their choice which is very wrong in business ethics and can deter there customer base.
People this days are careful of what they consume so the least there would do is to purchase from a random restaurants with out a focus niche or with no area of expertise in certain food making or other skills.
Choose your brand name: A brand name can help you stand out from other restaurants owners and can place you in a area of standard notice with your potential customer. A perfect name can be gotten from inspirations or what services you provided, let’s take for instance you make pizza as your major menu naming your restaurants (pizzaplace) can tell a lot of difference compare to (Tom Kitchen) because this second name is sounding as a generic name without focused niche.
Choose the right hosting provider: Hosting provider like Bluehost, Hostgator and WP engine can help with handling a lot of traffic that you would be getting from constant orders and inquires placed on your website.
Choose the right theme: Themes are a great requirements for designing a website that match with your business, it does not only make a your potential customers feel welcome it also embrace your business story if you can go with a theme that can speak for your business.
Let take for an instance you own a coffee shop, your theme design is meant to contain images of coffee, cofffee mugs and some short words on what coffee means to you.
Other quick list are:
- Brainstorm ideas on how to monetize your website be it by providing cooking guides, a donation page and integrate payment options for accepting orders
- Establish credibility with your potential customers by updating your website with educating contents mainly like recipes hacks, ingredients user guide and modern kitchen hacks
- Add basic contact me or about me information on your website for easier connection with your potential customer